Showing posts with label Christmas Cards. Show all posts

Tuesday, 17 December 2019

More Christmas Cards

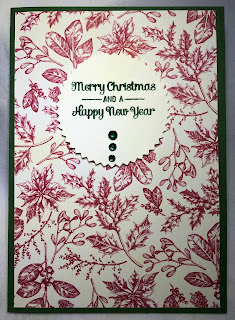
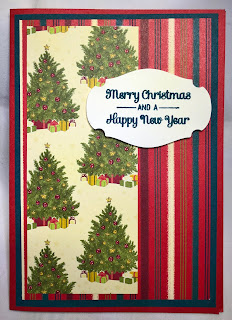
In spite of all the Christmas cards that I made earlier, I still needed around 30-40 Christmas cards for my family and friends (and a few for work contacts in our business), so I got busy last week and put them all together.

I had seen a card using three circular pieces somewhere on Facebook but I couldn't remember who made it. I thought it looked pretty good so I made some of my own using a variety of DSP.


They turned out quite well, really. I used two circle punches: 1-1/8" Scallop Circle Punch and the 1-3/4" Circle Punch (now retired) for a few of them, then I added the Starburst Punch to the mix and that gave them a little more oomph.

I wanted these cards to all be different, so I made some other designs as well, just using DSP and a variety of label punches.


And voila! That was pretty much all I did. Some are a little more elaborate than the others, but basically they're all the same and very simple to make.

Our craft group is on a break now, restarting sometime in January. In the meantime, I wish you all a very Merry Christmas and a Happy New Year. And, of course, happy crafting!

Saturday, 2 November 2019

Christmas Cards

Despite having been saying for months that I should get cracking on some Christmas cards, I hadn't made any until this week. I needed some to send to the Caring Hearts Card Drive. People make Christmas cards and then write or stamp a message inside and sign with their name and town. These are then distributed to people in aged care homes who may not otherwise receive a card. The people who organise this have been doing so for 10 years now, and our Craft Group took part last year. Unfortunately nobody was available to make any this year, so I decided I'd contribute some anyway.

To make it easier, I made the first batch using the Night Before Christmas Memories & More Card Pack. This pack contains 54 cards (6 each of nine designs - each double-sided) and whilst they aren't all suited to card making, I was able to use 3 designs to make 18 cards.


The smaller M&M cards are 4" x 3" and can be used as is. The larger size (Santa) is 6" x 4" and needed to be trimmed a little to fit on a C5 card (i.e. an A4 sheet of cardstock cut in half). But it wasn't a big deal and they turned out pretty well, I thought. I stamped some sentiments on the background mat for the smaller M&M cards, using the Itty Bitty Christmas Cling Stamp Set.


Would you believe that the mats for  both of these cards are Old Olive cardstock? The tree card base and the colour on the tree M&M card is actually Crushed Curry. It shows up more true to colour in the group photo.

I will keep some of these for myself and send some to Caring Hearts. I wanted to make some more (I was on a roll!) so I dragged out a now-retired M&M Card Pack called Santa's Workshop. This pack only had two of each different design (but still a lot of cards) so I was able to get a little more variety into them. Also, I was able to use some larger ones as mats for the smaller ones. I think they look pretty good (if I do say so myself).


Of course, the original purpose for Memories & More Card Packs is for scrapbooking, in particular, pocket scrapbooking. I keep planning to make pages and take lots of photos and keep lots of things like tickets to put in them, but I never seem to get the time to do it. Mind you, I did a whole album for my brother and his wife last year for Christmas/birthdays. They had a great trip to Europe and Lenny posted daily write-ups and photos, so I used the write-ups for the journalling and used selected photos in the album. I thought it turned out pretty well. I used the Best Route M&M Card Pack and DSP for this (these are also now retired, sorry!). The album is a Basic Black 6" x 8" Album and I used two or three packs of Variety Pack 6" x 8" Photo Pockets inside. Here are a sample of the pages, there are 40 double-sided pages in all.


Anyway, that's all from me for now. If you haven't already, time to get started on making your Christmas cards!

Happy crafting.

Sunday, 18 November 2018

Santa Punch Art Card


A fellow demonstrator, Donna Todd, posted a photo of a Santa card on Facebook and it was so cute that I decided that our Craft Group needed to make our version of the card. There are quite a few variations of the card, just Google "Santa Punch Art Card" and you'll find lots and lots of examples.

Donna made hers with regular cardstock, but I thought that the White Velveteen Sheets would be perfect to make Santa's beard and hat trim, being a little furry. 

So, here's how to make it...

Materials   (Click on the names to see the items in my shop)

  • Red A4 Cardstock 
  • White A4 Cardstock 
  • White Velveteen Sheets - regular white cardstock can be used instead
  • Pink A4 Cardstock
  • Black A4 Cardstock – a small scrap will do
  • Foam dimensional squares
  • Adhesives: 
    • Multipurpose Liquid Glue
    • Tape Adhesive
    • Mini Glue Dots
  • Charm/Trinket, or a stamped and coloured image or other embellishment could be used instead
Equipment
  • Paper Trimmer 
  • Big Shot 
  • Swirls and Curls Textured Embossing Folder 
  • ¾” (1.2 Cm) Circle Punch 
  • Stitched Shapes Framelits Dies or Layering Ovals Framelits Dies 
  • White Stampin' Chalk Marker 
  • Sponge Daubers 
  • Pink Ink Pad 

Instructions

1. Cut Red Cardstock 11” x 4” for the card base, score at 5½”. You will get two bases from one sheet of A4 cardstock.

2. Cut a piece of White Velveteen Sheets (or white cardstock) 4½” x 4” and emboss using the Swirls and Curls Textured Embossing Folder. If using Velveteen Sheets, adhere this to a piece of white cardstock of the same size as bits may break away when you cut it later. On the wrong side, make a pencil mark at 2½” (shown in red) and another at 3¼” (shown in green) on both sides. Then mark at 2” (red) and 2¾” (green) in the middle. 


3. Draw a curved line across each set of marks. TIP: You can use a plate to draw this curve. The area below the green line will be used for Santa’s beard, the strip between the red and green lines will be his hat trim and then we will use the other bit to create his moustache. 


4. To make the moustache, start about ½” in from the edge then draw a curved line to the centre, with the lowest part of the curve just under an inch from the centre top and the inverted V at about ½” from the centre top. It doesn’t have to be exact. Repeat on the other side and cut it out. The red line is the same red line in #3, after the pieces have been cut out. 


TIP: It may be useful to create templates for all three pieces for future cards using regular cardstock.

5. Punch two ¾” circles from the black cardstock and place a small line or mark on each using the White Stampin' Chalk Marker. (See my card photo at the top).

6. Use the second smallest oval from the Stitched Shapes Framelits Dies or the 1¾” long oval die from the Layering Ovals Framelits Dies to die cut Santa’s nose using Powder Pink cardstock.

7. Punch one ¾” circle from pink cardstock and a piece 2” x 4” for Santa’s face. 

8. Sponge around Santa's nose with pink ink, and add a little colour to his cheeks as well.

9. Attach all of the pieces in the following order:
  • Position the top of the pink face piece at 1¾” from the top of the card (i.e. the folded edge) using Multipurpose Liquid Glue or Snail Adhesive.
  • Adhere the beard flush with the bottom of the card (Multipurpose Liquid Glue might be best for this as it will allow for easier positioning). 
  • Adhere the hat trim so that the centre is about 1” from the top of the card, making sure that it covers the red at the bottom edge using Multipurpose Liquid Glue or Snail Adhesive. 
  • Adhere Santa’s lip and moustache, using Dimensionals for the moustache. 
  • Adhere the Snowflake Trinket, nose and eyes, using Dimensionals for the nose. 
10. Cut white cardstock 3¾“ x 5¼“and adhere inside the card using Multipurpose Liquid Glue or Tape Adhesive.

And there you have it, a cute Santa Christmas Card. I'll be making a bunch of them for my family and friends this year, so if you're on my Christmas card list, you just may get your own one of these!

Happy crafting.

Thursday, 21 September 2017

Scrappy Christmas Cards


How are you going at getting ready for Christmas? I've been making some Christmas cards and some Christmas jewellery gift boxes for a friend who makes jewellery.

These cards have been made using offcuts and scraps from the Christmas card kits that I prepared for the Rural Women's Retreat a few weeks ago (see one of my earlier blogs). I cut up DSP (Designer Series Paper) for the card fronts and was left with a whole bunch of strips measuring around half an inch wide. I found a video on You Tube about how to use these so I gave it a go.

I made three cards using scraps - I still have plenty of scraps to make some more!

Cut your card base to whatever size you want (mine are 4" x 6"). You'll need a piece of cardboard cut to size for your card (mine are 3.5" x 5.5"). Any old cardboard will do, you won't be able to see it when you've finished - it's a good opportunity to use those pieces of cardboard that come with the packs of DSP! I used Multipurpose Adhesive Sheets on the backing cardboard so I could lay down the strips easily. I could have used glue but I didn't want to be bothered with applying more and using it before it dried, plus the Adhesive Sheets give you full 100% coverage on the backing, no bits falling off later.

Lay down the strips diagonally in any order to make a nice pattern. Start in the middle and work out to the edges. Try to use paper that is the same thickness (but different widths are fine) and don't worry about what piece goes where - there's no right or wrong with this technique. Don't forget to use both sides of the DSP, too. Once the backing is fully covered, just trim off the excess paper around the edges and adhere the front to the card base. Stamp your sentiment onto Whisper White cardstock using coordinating ink, then punch or die-cut the labels, mount them with Stampin' Dimensionals and decorate the card with some rhinestones. You can use coordinating cardstock to make a mat if you choose. Here are close up shots of the three cards that I've made so far.

This one has a Cherry Cobbler mat under the front piece and I punched a Starburst in Garden Green to place under the sentiment label.

I love the Stitched Shapes Framelits dies, that 'stitching' around the edge gives it that extra oomph

This technique works on cards in any format (landscape or portrait)

I also used some scraps to make pinwheel embellishments for those gift boxes that I mentioned earlier, but more about those next time.


Thanks for reading, I hope it's given you some ideas.

Ellen Budden


Friday, 25 August 2017

SA Rural Women's Retreat

Last weekend my daughter, Kieran, and I set up a card making table for the SA Rural Women's Retreat in Woomera, SA. We were expecting 4 groups of 10 women but ended up only having 5 women join us (and 4 of those women came twice). It was a little disappointing but the women who took part really enjoyed the cards.

I had made up a set of Christmas cards featuring the Be Merry Designer Series Paper and the Cookie Cutter Builder Punch.


Stamp Set: Better Together 
Stamp Set: Cookie Cutter Christmas 
Stamp Set: Hang Your Stocking 
DSP: Be Merry 
Punch: Bell 
Punch: Starburst 
Punch: Pretty Label
Punch: Cookie Cutter Builder 


The ladies enjoyed these but asked for  some birthday cards for the second day. So Kieran and I went home that night and whipped up a batch of birthday cards for them to make on Day 2. These were very popular, especially the balloon one.


Stamp Set: Badges & Banners 
Stamp Set: Daisy Delight 
Stamp Set: Happy Birthday Gorgeous
Stamp Set: Label Me Pretty 
DSP: Birthday Memories 
DSP: Delightful Daisy 
DSP: Naturally Eclectic 
DSP: Pick a Pattern 
Punch: Balloon Bouquet 
Punch: Best Badge
Punch: Daisy 
Punch: Everyday Label 
Punch: Pretty Label
Punch: Starburst 
Embellishment: Gold Faceted Gems 

Although a bit disappointing we really enjoyed teaching the ladies some new skills. None of them had EVER made cards before but they picked it up like real champs.

Ellen Budden