A year ago I made about 30 mini calendar cards as swaps for OnStage Local in Melbourne.
I shared the 'skill' with my craft group earlier this year and, at their behest, we had another class last week with 2019 calendars. I dug out a few different designs and the ladies enjoyed making their calendars.
Desk Calendar
A very easy self-standing desk calendar.
Materials
·
Plain cardstock
(calendar base) 8½" x 5½"
·
Patterned Paper to match, 2⅞" x 5⅜"
·
Coordinating
cardstock (calendar mat), 3" x 2" (Note: The mat dimensions may need
to be adjusted depending on the actual size of the calendars)
·
Mini calendars (we got ours on eBay)
Equipment
·
Paper trimmer
·
Bone folder
·
Adhesive, e.g.
Tape Adhesive or Multipurpose Liquid Glue
·
Ribbon or Washi
tape (optional)
·
Embellishments,
e.g. Enamel Dots or Shapes, Faceted Gems
Instructions
1.
Cut the base cardstock 8½" x 5½",
score at 3", 6", 7" and 8" on the long side. Fold so that
it looks like the diagram on the right from the side. Do not apply any adhesive just yet though.
It's easier to attach the other elements whilst it is still flat.
2.
Cut the patterned paper 2⅞" x 5⅜".
3.
Adhere the patterned paper to
either of the two long sides.
4.
Cut the calendar
mat 3" x 2".
5.
Adhere the
calendar to the mat, then adhere them both to the patterned paper on the calendar.
6.
Decorate and embellish
as desired.
Examples
Other Versions
Landscape Self-Standing Calendar
Basically the same as the one above, but in landscape
 |
| Here's one made by Samantha at our class |
· Cut your cardstock 4” x 11½” and score at
4½”, 9”, 10” and 11”
· Cut the card mat/patterned paper 3¾” x 4¼”
· Cut the calendar mat 3” x 2” (check the size
of your calendar first) and adhere to the calendar
· Adhere the calendar to the card and add
embellishment as desired
 |
| Heather made this one |
 |
| Another of Sam's creations |
Easel Card Calendar
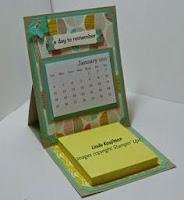 ·
· Cut cardstock 4” x 10”, score at 5” and 7½“
on the long side for the base
· Cut a second piece 4” x 5” for the card
front
· Cut patterned paper 3¾” x 4¾” for the card front
· Adhere the card front to the card base but
only up to the score line (i.e. 2½” from the bottom)
· Cut the calendar mat 3” x 2” (check the size
of your calendar first) and adhere to the calendar
· Cut a second piece of patterned paper 3¾” x 3¾” and
adhere on the card base (the yellow patterned paper in the photo) and add a pad of sticky
notes or small note pad.
· Add sentiments/embellishments as desired OR you can make it as above but then
· Cut patterned paper 3½“ x 3½“ and a piece of cardstock
3¾” x 3¾”
· Adhere them together and then mount them
with Foam Dimensionals and not include a pad of sticky notes.
· Or add a label or similar that is mounted
with Dimensionals. Anything to stop the top sliding down.
· Add sentiments/embellishments as desired
Fridge Magnet Calendar
Make a card front
measuring, e.g. 4” x 6” (or any size, really), decorate as desired, adhere the
calendar and add a magnetic strip to the back.
And there you have it.
Happy crafting.


