Tuesday, 24 October 2017
Watch This Space!
Hi folks. Sorry I haven't posted for a little while. I was in hospital having half of my thyroid removed. But it's healing nicely now so I will get a new blog post out very soon! The Pinwheel and Small Gift Box one, as promised. Thanks.

Thursday, 5 October 2017
Basic Equipment and Materials for Card Making AND A Basic Card Tutorial
I know I said I was going to post about the small gift boxes and pinwheel embellishments, but I'm still working on the boxes so I've decided to give you all a run through of the basic equipment and materials needed to make cards. People, like myself, who have been making cards for a while forget that somebody who is new to card making may not know what they need. So I made up this document to give to new customers. If you'd like a copy of the original document, just let me know and I can send you a copy via Messenger or email.
Basic Equipment


Stamping
Essentials
You should also consider:


What
Stamps To Get?
Other Equipment
These will help and are nice to have, but aren’t essential.
Basic Equipment
There are a few items that are
essential for card making. Here is a list of the ones I think every cardmaker should have.
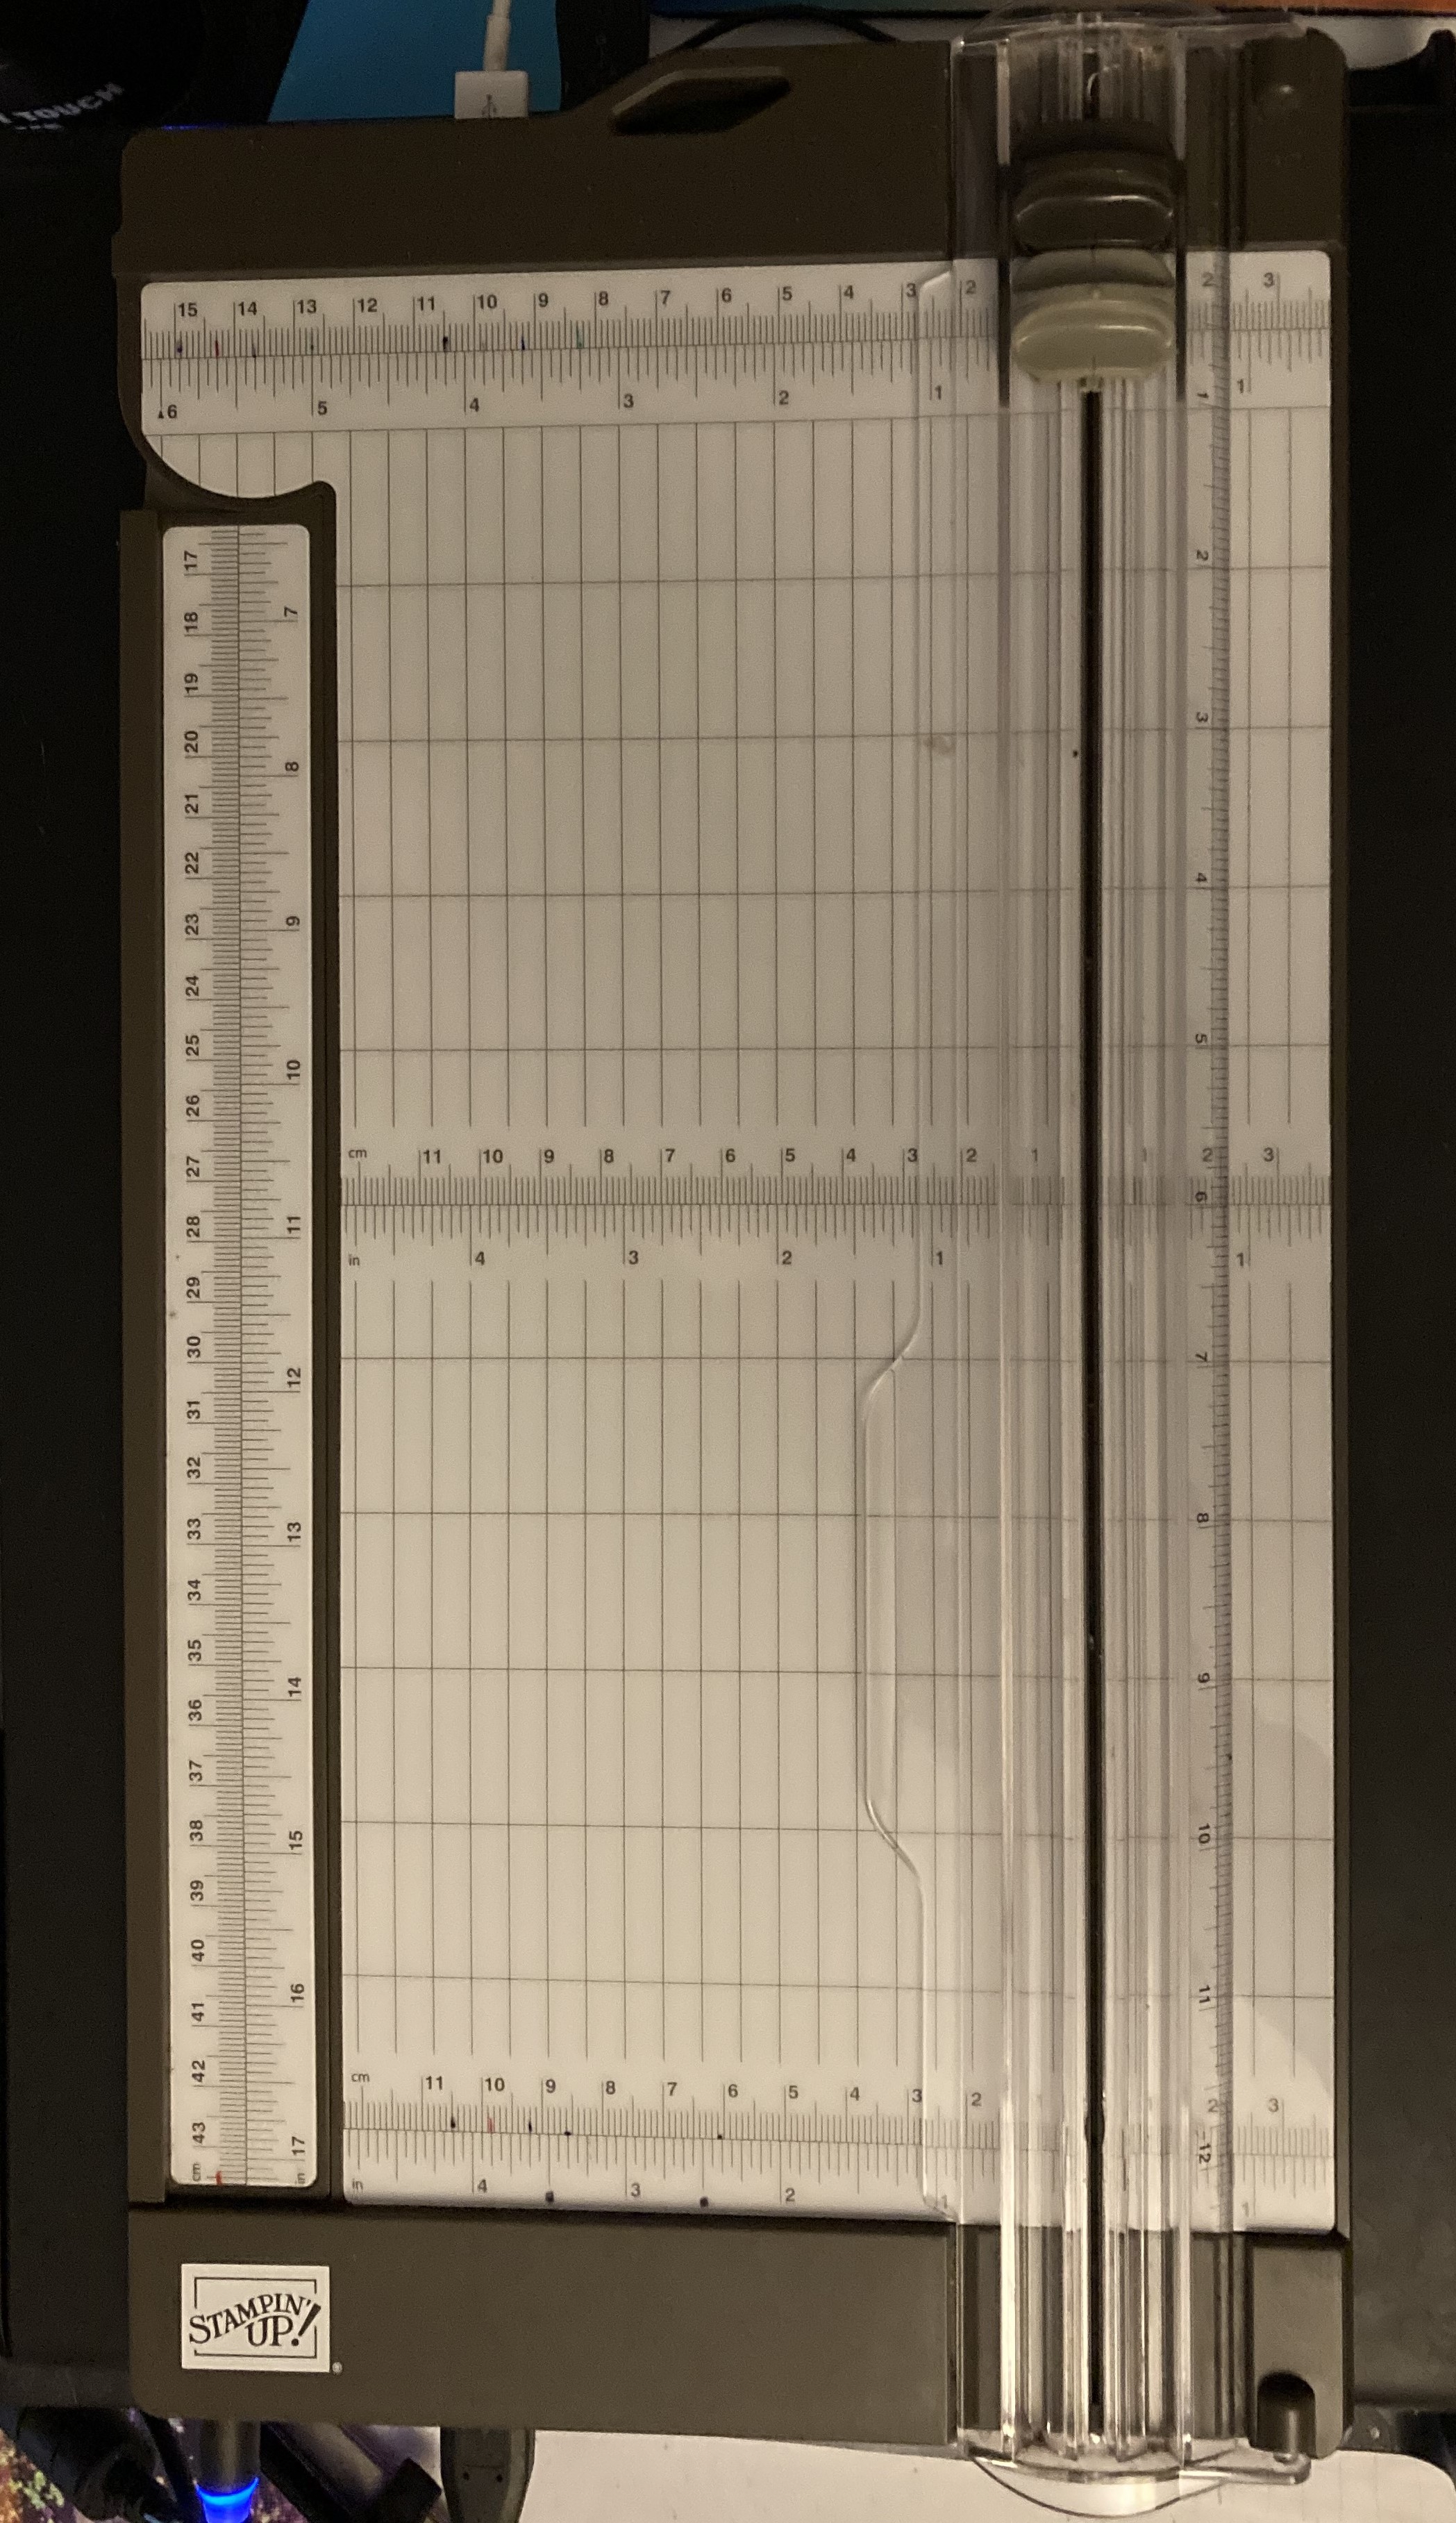
· Paper Trimmer. A good paper trimmer is essential
for cutting cardstock and paper. I prefer one that has a wide base for
cutting up to 6¼" and has an extending arm for trimming up to 14½", if required. It has a cutting blade as well as
a scoring blade and is easy to use. It also has storage underneath for
replacement blades (available separately) or small tools.

· Bone Folder. These are used to burnish cardstock
as well for scoring and distressing.
· Adhesive. Adhesives come in many
types. Some types are better than others for certain things, e.g. I would use super-strength tape for adhering ribbon, but otherwise it's whatever suits you better. Personally, I
use double-sided tape mostly.
o
Double-sided tape
o
Roller
tape
o
Super-strength tape for heavier embellishments
o
Multipurpose
Liquid Glue – liquid glue that dries clear; has a fine tip and a broad tip
· Sharp
scissors in two sizes:
o
Large ones to
trim a piece of card or paper, if necessary
o Small ones for more delicate trimming or for cutting out a stamped
image or pictures from a larger sheet, commonly called 'fussy cutting'.
· Pencil. Either a regular wooden one (in which case you will
need a sharpener as well) or a mechanical pencil with replacement leads. And
don't forget an eraser.
· Ruler. I recommend a metal ruler with both imperial and
metric measurements.
· Pick Tool. A sharp pointed tool to use with
embellishments, e.g. rhinestones, to pick them up and position them.
Stamping
Essentials
You don’t have to stamp
anything on your cards, but they look a lot better with images or sentiments
stamped on them.
· Stamps. Rubber stamps come in three types. It's a
personal preference as to which type you use.
|
|
||

These are rubber stamps, usually red, with a small pad behind them. They are
not, as the name suggest, clear, but are used with a clear block.
Pros:
Cheaper than wood-mount, they're also lighter and take up less shelf space.
Cons: You
need to have the appropriate clear block to use them, but you can re-use the
blocks over and over.
|

The same as the clear-mount stamps but they come with wooden blocks for you
to mount them.
Pros: Once
they've been mounted onto the wooden blocks, they're ready to go.
Cons:
They're more expensive and take up more shelf space.
|

These are the totally clear stamps; you can see right through them and can
position them more precisely.
Pros: You
can see exactly where you are placing them when stamping.
Cons: You
need to have the appropriate clear block to use them. Some inks will stain
them but doesn't affect the quality or image.
|
· Clear Blocks. They range in size but I mostly use one measuring 3" x 3". Of course, larger stamps need larger blocks.
· Stamping Mat. Similar to a mouse pad but a little thicker. Place it underneath your cardstock when stamping, helps to
provide even pressure and makes a crisper image.
· Stamp Cleaner. Clean your stamps regularly to keep them in peak condition.
· Ink Pads. Obviously, if you have stamps then you need ink
pads. Classic Stampin' Pads use a dye-based, fast drying ink. They are acid
free and use a firm foam pad that lasts longer than felt pads.
Best of all, the colours all coordinate with Stampin’
Up! cardstock, markers, and embellishments. There are 46 colours plus Archival
Pads in black and grey. Archival ink is a permanent ink that is suitable for
use with watercolour pencils and markers.
o
As a bare
minimum, get the Basic Black Archival
Stampin’ Pad (140931, p 185).
You should also consider:
o
2016-2018 In
Color Classic Stampin' Pads (pack of 5) (141818)

o
2017-2019 In
Color Classic Stampin' Pads (pack of 5) (144081)
o
Other colours are
available in packs of 10 assorted colours, apart from Neutrals which is a pack
of 6.
 |
| Brights (131182) |
 |
| Regals (131184) |
 |
| Subtles (131185) |
 |
| Neutrals (140933) |
What
Stamps To Get?
It is, of course, personal
choice, but I'd suggest starting with one or two 'all-purpose' sentiment stamps
like the ones below. There are so many beautiful images to choose from as
well. Take the time to have a good look in the catalogue. Check Google or
Pinterest for photos of cards made with various stamp sets. Simply search by
the name of the stamp set (and the words 'stampin up' to be sure to get the right stamp set) and let them inspire you.
Picture:
|
 |
 |
Name:
|
Better Together
|
Special Celebrations
|
Item Code:
|
141736 (Clear-mount)
141733 (Wood-mount)
|
143885 (Clear-mount)
143882 (Wood-mount)
|
Description:
|
This stamp set includes
sentiments for a new baby, weddings, sympathy, Christmas and birthdays, as
well as a few basic images for decoration.
|
This stamp set includes
stamps that can be used on the front of a card as well as inside the card. This
stamp set will work for love, marriage, friendship, congratulations, baby and
birthdays.
|
Other Equipment
These will help and are nice to have, but aren’t essential.
· Punches (p 206-208) – easily punch out a variety of
shapes
· Big Shot (143263, p 209) – a machine for die-cutting
or embossing
· Dies (pp 212-216) – Cut out lots of shapes including
words. A Big Shot is required for these.
· Embossing Folders (pp 210-211) – these create great
texture and patterns on your cardstock. These also need a Big Shot.
· Simply Scored (Scoring Board) (122334, p 2015) – note
that you can score with the Paper Trimmer as well as cut.
· Tweezers, for picking up those small bits and pieces.
Basic
Materials


To Make a Simple Card


Examples of Basic Cards

Some Other
Card Styles
Basic
Materials
·
12" x
12" or A4 Cardstock for card bases (page 194):
o Whisper White
o Very Vanilla
o Various other colours
· Stampin’ Dimensionals (104430, p 203) or Mini Stampin’ Dimensionals (144108, p 203) – double-sided foam pieces to create extra depth and dimension to your cards.
·
Designer Series
Paper (pp 187-189) – patterned paper to make your cards look pretty

·
Rhinestone Basic
Jewels (144220, p 197) or Pearl Basic Jewels (144219, p 197)

·
There are plenty
of other pretty embellishments as well on pages 196-197.

·
Ribbon or twine
(optional) – many sizes, textures and colours available. See them on pages
198-199.

To Make a Simple Card
1. Cut your card bases.
a.
For 12” x 12” Cardstock
·
Cut
at 4” - this piece will measure 4” x 12”.
-
Score
this piece at 6” on the long side.
 |
| Cut on red line, score on blue dotted line |
·
Then
turn the paper 90 degrees and cut at 6” – this will give you two pieces
measuring 6” x 8”.
-
Score
these pieces at 4” on the long side. (You can score before cutting if you like)
 |
| Cut on red line, score on blue dotted line |
·
This
will give you three cards, each measuring 4” x 6”. They can be used portrait of
landscape.
b. For A4 Cardstock:
·
Cut
at 5⅞” on the long
side
·
Score
each piece at 4⅛”
 |
| Cut on red line, score on blue dotted line |
·
This
will give you two cards, each measuring 4⅛” x 5⅞”. These can be used in portrait or landscape.

c. All of the cards can be used in any
configuration that you like. Cards can open upwards or sideways – whatever you
choose.
2. Cut your Designer Series Paper (DSP)
- Generally, it’s a good idea to cut the DSP
slightly smaller than the actual card so as to provide a frame. You can
cut it any size that you want, but around ¼”-½” smaller is best.
b. For cards made from 12” x 12”
cardstock, it’s easy – just cut the DSP 3¾” x 5¾”, or 3½” x 5½”.
c. For cards made from A4, to avoid all
those nasty eighths of an inch, just go the same as the others: 3¾” x 5½”, or 3½” x 5¼”.
d. These sizes are not set in stone. You
can make them bigger or smaller, they don’t even need to leave the same sized
border all around – it’s up to you.
e. You can create a layered effect by
cutting a mat of contrasting plain cardstock at the larger of the DSP
measurements, then cutting the DSP at the smaller size. Or vice versa!
- Stamp any images
or sentiments onto the card, or onto contrasting cardstock if using
punches or dies. If you don’t have punches or dies, you can still stamp
onto contrasting cardstock and cut it out with your trimmer or scissors.
- Use adhesive to stick down your elements. It’s generally
best to add embellishments, such as rhinestones, after the card has been
put together. However, if you want to use ribbon or twine, then add these
to your contrasting cardstock or DSP BEFORE sticking it to your card base.
For ribbon, I find it best to place the adhesive on the surface of the
cardstock/DSP and then place the ribbon on top. Wrap it around to the back
and adhere it there as well.
Examples of Basic Cards

Some Other
Card Styles
 |
| Double Z-Fold Card - nice and easy, but looks awesome |
 |
| Double Front Card (This is the card I made for my granddaughter's first birthday) |
 |
| Fun Fold Card - really easy and great looking |
 |
| Front Fold Card - another one that looks fabulous but isn't too hard to make |
Hopefully this will help all new card makers and maybe even serve as a reminder of what's out there to some not-so-new card makers.
P.S. I f you find a link that doesn't work, please let me know. Thanks.
Ellen Budden
Thursday, 21 September 2017
Scrappy Christmas Cards
How are you going at getting ready for Christmas? I've been making some Christmas cards and some Christmas jewellery gift boxes for a friend who makes jewellery.
These cards have been made using offcuts and scraps from the Christmas card kits that I prepared for the Rural Women's Retreat a few weeks ago (see one of my earlier blogs). I cut up DSP (Designer Series Paper) for the card fronts and was left with a whole bunch of strips measuring around half an inch wide. I found a video on You Tube about how to use these so I gave it a go.
 |
| I made three cards using scraps - I still have plenty of scraps to make some more! |
Cut your card base to whatever size you want (mine are 4" x 6"). You'll need a piece of cardboard cut to size for your card (mine are 3.5" x 5.5"). Any old cardboard will do, you won't be able to see it when you've finished - it's a good opportunity to use those pieces of cardboard that come with the packs of DSP! I used Multipurpose Adhesive Sheets on the backing cardboard so I could lay down the strips easily. I could have used glue but I didn't want to be bothered with applying more and using it before it dried, plus the Adhesive Sheets give you full 100% coverage on the backing, no bits falling off later.
Lay down the strips diagonally in any order to make a nice pattern. Start in the middle and work out to the edges. Try to use paper that is the same thickness (but different widths are fine) and don't worry about what piece goes where - there's no right or wrong with this technique. Don't forget to use both sides of the DSP, too. Once the backing is fully covered, just trim off the excess paper around the edges and adhere the front to the card base. Stamp your sentiment onto Whisper White cardstock using coordinating ink, then punch or die-cut the labels, mount them with Stampin' Dimensionals and decorate the card with some rhinestones. You can use coordinating cardstock to make a mat if you choose. Here are close up shots of the three cards that I've made so far.
 |
| This one has a Cherry Cobbler mat under the front piece and I punched a Starburst in Garden Green to place under the sentiment label. |
 |
| I love the Stitched Shapes Framelits dies, that 'stitching' around the edge gives it that extra oomph |

 |
| This technique works on cards in any format (landscape or portrait) |
I also used some scraps to make pinwheel embellishments for those gift boxes that I mentioned earlier, but more about those next time.

Thanks for reading, I hope it's given you some ideas.
Ellen Budden
Saturday, 2 September 2017
Two Tone Happy Birthday Card
The 2017 Holiday Catalogue is available NOW!! Lots of lovelies in there. I will include some of the new items in my next blog.
I subscribe to Lisa Curcio's You Tube channel. Lisa is a US Stampin' Up! demonstrator and has some great tips and cards. This is one of her cards and we made this one at our Craft Group get-together this week. Lisa has very kindly allowed me to use her card in my blog. The photos used in the instructions are taken from Lisa's video. The video itself is at the bottom.

Equipment
Instructions


I subscribe to Lisa Curcio's You Tube channel. Lisa is a US Stampin' Up! demonstrator and has some great tips and cards. This is one of her cards and we made this one at our Craft Group get-together this week. Lisa has very kindly allowed me to use her card in my blog. The photos used in the instructions are taken from Lisa's video. The video itself is at the bottom.

This is my version of Lisa's card. I forgot to use Dimensionals for the "Birthday" pennant (doh!).
Materials
·
Pool Party A4
Cardstock
·
Whisper White A4
Cardstock
·
Basic Black A4
Cardstock
·
Mini Stampin'
Dimensionals
· Multipurpose Liquid Glue
· White Stampin' Chalk Marker
· Pool Party Classic Stampin' Pad
· Pear Pizzazz Classic Stampin' Pad
· Basic Black Archival Stampin’ Pad
Equipment
·
Paper trimmer
·
Bone folder
·
Big Shot
·
Balloon
Celebration Photopolymer Stamp Set
·
Marquee Messages
Photopolymer Stamp Set
·
Happy Birthday
Thinlits Die
·
Sponge Daubers
·
Paper Snips
·
Silicone Craft
Sheet
·
Stampin' Sponge
Instructions
1. Cut the
cardstock as below:
·
Pool Party
cardstock base is cut 5½" x 8½", score at 4¼" on the long edge
·
Basic Black
cardstock layer is cut 3⅞" x 5⅛"
·
Whisper White
cardstock layer is cut 3¾" x 5"
·
Whisper White
cardstock banner is cut ¾" x 2¾"
2.
Using the two solid balloons from the
Balloon Celebration Photopolymer Stamp Set, stamp in Pool Party and Pear
Pizzazz as per the picture, don't forget to stamp the strings as well. Use a Chalk marker to put a "!" on the
top edge of each balloon to give a bit of depth.

3. Using
the Happy Birthday Thinlits Die, die cut the Happy Birthday in Whisper White
and Basic Black. Trim them so you just have the "Happy", or just
place the cardstock so that you only get the "Happy" - some trimming
will probably still be required, however.

4.
Mask half of the Whisper White "Happy"
using one or more sticky notes and add colour using a dauber or sponge. Move
the mask and do the same to the bottom. Leave a small amount of the first
colour showing when you set up the second mask so that you don't end up with a
white line across the middle.

5.
Adhere
the coloured "Happy" to the black one. A good method for doing this
is to use the Silicon Craft Sheet and a piece of Stampin' Sponge. Place some
Multipurpose Liquid Glue onto a corner of the sheet and then use the sponge to
gently daub the glue onto the back of the coloured "Hello". You won't
need much glue. Store the piece of sponge in an airtight container to prevent
the glue from drying out. You can use this over again whenever you need it.
Place the coloured "Hello" onto the black "Hello"
positioning it slightly off to create a shadow effect. Adhere to the card using
glue or Mini Stampin' Dimensionals.

6.
Stamp
the "Birthday!" from the Marquee Messages Photopolymer Stamp Set onto
the small piece of Whisper White cardstock leaving some room on the left to cut the pennant
end. Once the end is cut, adhere to the card with the right side lined up with
the right side of the white mat.
The ladies in the Woomera Craft Group had a fun time making this card. Here we are with our cards.
 |
| Ladies of the Woomera Craft Group, l to r: Kara, Amanda, Heather, Kieran and me! |
This is Lisa's video
Thanks for reading today's blog. I hope you enjoy making your own version of this card, and thanks again to Lisa Curcio for the inspiration and the permission :)
Ellen Budden
Subscribe to:
Posts (Atom)