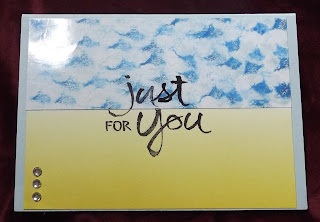
Why don't you give it a go?
Materials
- A4 Glossy White Cardstock - cut to size (I cut mine into quarters)
- Isopropyl Alcohol (Rubbing Alcohol)
- Two or three Classic Stampin' Ink Refills
- Cotton Balls
Method
- Use only two or three different colours, otherwise it may look muddy.
- Add some IPA (isopropyl alcohol) to a cotton ball.
- Add a few drops of each colour to the cotton ball. The number of
drops depends on how much of each colour you want. For example, you might
use 1 drop of a darker colour and 3 or 4 drops of a lighter colour.
- Dab the cotton ball onto the cardstock. DO NOT RUB! Just dab all
over, you can go over places where you've already dabbed, if you like. It
doesn't really matter how much you do, just keep going until it looks OK
to you. If you turn the cotton ball as you dab you will avoid duplicating the pattern over and over.
- Once it has dried, you can stamp directly onto the Glossy Cardstock if you like, to use it as a background, or run it through a Big Shot, or cut it into smaller pieces.
Examples
Here are some of the cards I've made using this technique. I cut a couple of the pieces in half and used them with Designer Series Paper but I think I prefer them whole as a background.
Stamp Set: Watercolor Words Photopolymer
DSP: Color Theory
Stamp Set: Layering Love
Stamp Set: Label Me Pretty
Punch: Pretty Label Punch
DSP: Color Theory
Punch: Starburst Punch
Stamp Set: Lots of Love
DSP: Color Theory
Punch: Starburst Punch
Punch: 1-3/4" Circle Punch
Stamp Set: Remarkable You
Stamp Set: Sorry For Everything
Stamp Set: Lovely As a Tree
Stamp Set: Happy Birthday Gorgeous
Stamp Set: Remarkable You
Stamp Set: Remarkable You
Stamp Set: Lovely As a Tree
Stamp Set: Daisy Delight
Ellen Budden


Love love love this! I hadn't heard of this technique but it looks amazing 😍
ReplyDeleteThanks, Sara. It's very easy to do and lots of fun.
DeleteThanks for sharing Ellen great technic xx
ReplyDeleteThank you, Sharon.
DeleteAwesome Ellen!! Well done on getting a blog set up!! You are a rockstar!!
ReplyDeleteAll credit to you, Kylie. Thanks for the inspiration.
DeleteWoohoo Ellen has joined the blogging world. Welcome and good on you Ellen I have not tried this technique myself as yet but you have shared with us all a few different looks and how cards can look.
ReplyDeleteI particularly love the card with using "Lovely as a Tree" Stamp Set and the "Remarkably You" card is a close second as my favourites.
Looking forward in seeing more of your talent on your blog in the future 😘🍷
Thank you, Christine. My favourite is that "Thanks" card, too. Have a go, it's easy and fun!
DeleteCongrats Ellen, Love that you have joined the logging world xx I lvoe your technique too. It certainly is a versatile technique and can be used for somany occasions! TFS
ReplyDeleteThanks, Kim. I was a bit scared about blogging but I'm loving it so far :). I love the techniqque as well, lol.
DeleteThank you for sharing your blog and this technique. I haven't tried either yet.
ReplyDeleteYou're welcome. Do try the technique, it's really fun. And blogging isn't as scary as I expected it to be.
Delete