We made some Christmas decorations at craft this week. We made an angel, a snowflake and a star. They were a little trickier than I initially expected, but we got there in the end and had a few good laughs along the way. All of the instructions are below, and I've given you the URLs for the original videos that inspired me.

First we tackled the angel.
Paper
Angel
(https://www.youtube.com/watch?v=V1DyuVOS4DI)

Equipment
- Paper Trimmer
- Bone Folder
- ¾” Circle Punch
Materials
- Patterned paper 6” x 6” (for the angel) - it doesn't have to be Christmas paper though
- Scrap piece of patterned paper (for the head)
- 1” x 4” (or 2” x 2”) Thick White Cardstock
- Coordinating ¼” Ribbon (8” long)
- Double-sided tape adhesive
- Multipurpose Liquid Glue (Tombow)
- Rhinestones/pearls/other embellishments, as desired
Method
- Score the 6” x 6” patterned paper at ½” intervals along one side.
- Turn the cardstock 90° (so the score lines running across the sheet) and score at 2” and 4’ then cut 3”
- Fan-fold both pieces of patterned paper.
- Once fan-folded, bend the folded piece at 2” (this will create the wings and give you one half of the angel). Burnish the piece, if desired. Adhere one short edge (wings) to one long edge (skirt) – choose the edges that are closest to each other.
- Repeat with the second piece of patterned paper.
- Place a piece of double-sided tape along the edge of the ‘skirt’ that does not have a wing attached and place a piece of ribbon to form the hanging loop. Add an extra piece of tape over the top of the ribbon so it will stick onto the other half of the skirt. Don’t place the ribbon too close to the edges though or it will show. Do the same on the second half (with the other end of the ribbon, off-setting the positioning to minimise the bulk), add more tape and stick the two halves together.
- Use Thick Whisper White and punch out 4 x ¾” circles. Using Tombow, glue two together and the other two together. Punch two more circles using scrap patterned paper and glue these to each pair of circles.
- Using Tombow again, glue the two circles together at the top of the angel, over the ribbon (pull it tight and flatten it as much as possible). Slide it down as close to the wings as you can. Optional: add Wink of Stella on the head or the edge of the skirt and/or wings or add rhinestones/pearls or whatever you want.
EDIT: A friend later suggested using a extra piece of cardstock folded in a square to separate the two halves of the head. We had a lot of trouble getting the head to sit straight because it twists to be the same as the ribbon.
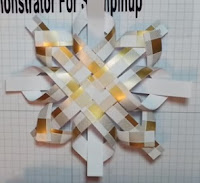
Next, we tackled the snowflake. This one looks so good when it's finished. It's finicky the first time, but really easy.
3D
Snowflake
(https://www.youtube.com/watch?v=DjbErGDRKF0)
 |
| You need to have a suitable pattern on the back of the patterned paper. The green isn't that great but the gold looks good! |
 |
| These look really cool when made with vellum |
Equipment
- Paper Trimmer
- Small scissors
- ⅛”Circle Punch
Materials
- Patterned paper 6” x 6”
- Coordinating ¼” Ribbon (6”-7” long)
- Mini Glue Dots or Double-sided Adhesive - it works just as well as the Glue Dots but the Glue Dots are easier.
Method
- Cut the 6” x 6” patterned paper into 12 x ½” strips.
- Get two strips, fold each in half and pinch lightly to find the centre of each strip.
- Lay one strip vertically face down and place two glue dots along the centre fold. Place the second strip horizontally across the first one to form a +.
- Now place more glue dots to the horizontal
strip on the outside of the centre square (the blue dots on the diagram).

- Lay another strip to the left and right of
the vertical strip, across the top of the horizontal strip. Be sure to line up
the top and bottom edges of the strips.

- Place
more glues dots as shown in the diagram. You can add one or two; whatever you
think will work best.

- Fold
up the centre vertical piece at the bottom and place another strip across so
that it will be under the centre strip and on top of the other two. Add another
dot underneath the vertical piece before flattening it, to hold it in place. Do
the same at the top.

- Lift
the top horizontal strip and place a glue dot on the right side (pattern-wise)
of the strip. You will have to give it a little twist to do that. Then get the
left vertical strip and give it a twist and stick it to the other strip.
Continue for all four corners.

- Repeat steps 2 to 8 with the other six strips.
- Place
one piece on the table with the wrong side up (same as when you made the
piece), then take the other piece, turn it over so it’s right side up and place
it on top of the first piece. Feed each of the long strips through each of the
corner parts (as made in step 8). You may find it easier to do one side and
then flip it over to do the other side.
- Using glue dots again, adhere each strip to each corner.
- Trim off the excess at each corner (i.e. the long bit that is sticking through.
- Punch a small hole in one corner and feed the ribbon through the hole. Tie a knot at the top and it’s ready for hanging.
- Add some rhinestones or other embellishments to the centre and inside each corner for added sparkle.
- You can make a larger star by using 12” x 12” and cutting into 1” strips. This size would be suitable for the top of the tree (and therefore wouldn’t need ribbon).


Christmas
Star
[I couldn’t find the original video that the screenshots are from, but it’s the same method]
[I couldn’t find the original video that the screenshots are from, but it’s the same method]
(https://www.youtube.com/watch?v=6Wgdn3piXpU)

Equipment
- Paper Trimmer
- Small scissors
Materials
- 2 x Patterned paper 6” x 6”
- Coordinating ¼” Ribbon (6”-7” long)
- Multipurpose Liquid Glue (Tombow)
- Mini Glue Dots
Method
- With the right side down, fold the patterned paper in half from side to side, in both directions.
- Fold it again diagonally in both directions.
- One
each centre line (not the diagonal lines), draw a line 1¼” from the edge. This
mark won’t show as it’s on the wrong side of the DSP. You will have 4 lines in
total. Snip along each pencil line.

- Gently
fold one piece into the diagonal line to make a triangle. Repeat with the piece
next to it.


- Do the same on all four corners.
- In
one corner, glue one of the folded pieces over the other. Repeat with all four
corners.


- Repeat steps 1-6 with the second piece of patterned paper.
- To join the two sides, place two glue dots at the base of each of the points (around the hole in the middle) and then press the stars together, offsetting the points.
- If you wish to hang this star, take a glue dot, roll it and stick it one
end of the ribbon, then do it again at the other end. Glue the ends to the top
of one of the corners (place one near the top and then the other straight below
it). Alternatively you can punch a small hole and thread some twine or ribbon


They are all really pretty and not too hard at all. I urge you to watch the video first and then use a printout of the instructions when you make them.
Here are some of the ones made at our craft group...
 |
| Libby and Annette displaying their goodies. |
 |
| A star and angel made by a shy Amanda |
 |
| Sam was pleased with her creations |
 |
| Another shy crafter, Donna, made these. This was Donna's second time of making any paper crafts ever! |
I hope you enjoy making these. They'd be suitable to make with your kids or grandkids, too.
Happy crafting!
They look great :)
ReplyDelete