Wednesday, 28 February 2018

Double Front Card

I have a new obsession: Double Front Cards! I just love them. This is the first one that I made...

This is the front of the card

Open the card and here's the second 'front'. This card uses the Heartfelt Blooms stamp set.

Open the second front to get to the inside of the card

I watched a video by Connie Stewart and copied the card from that. I messed up a little because the strip of patterned paper on the second front (I call it the middle) should have been on the very front. Oops! I did it properly on three of the next four card that I made though, haha. I made some baby cards this time, two boy cards and two girl cards. They are all slightly different though because I goofed up on some of them. But to card makers there is no such thing as a mistake, just an opportunity to be creative.


This is the 'perfect' girl one, everything ended up where it was supposed to be. I coloured the bear with Stampin' Blends. 

The middle section
The inside of the card, more Stampin' Blends used for the flower.
This is exactly the same but in blue. The middle and inside are the same as the pink version, but in blue of course.
This is the other pink one that I made; one of my 'opportunities' for creativity.

I forgot to put the DSP on the front...
... so I put it in the middle.

On review I think I might cut an extra piece of patterned paper and put a piece on the front AND in the middle in future!

My other blue one was a little more of an 'opportunity'. When you're making this card, you only put adhesive on half of the piece on the front (otherwise it will stick to the middle and you won't be able to open it properly). Well, I put adhesive all over the back of the bear piece (oops!!). Fortunately I hadn't attached the middle piece so I was able to place the teddy bear in the middle and the sentiment on the front. Different but not too bad, considering.

Sentiment on the front
Teddy in the middle.

Here are the instructions for this card.

Materials

·         Plain coloured cardstock (the outside card) 
·         White or other light cardstock (for the insert and the small pieces on the front and middle)
·         Coordinating coloured cardstock (mat for the pieces on the front and middle)
·         Coordinating patterned paper (accent pieces) - I used Bundle of Love
·         Ribbon and/or other embellishments, as desired

Equipment

·         Paper trimmer 
·         Bone folder 
·         Adhesive
·         Stamps
·         Ink pads 

Instructions

1.       Cut the coloured cardstock for the outside of the card 6" x 5½", score at 2" on  the long side.

2.       Cut a piece of white or light cardstock 8" x 5¼", score at 4" on  the long side.

3.       Cut TWO pieces of the coordinating cardstock 2¾" x 4¼" (for the front and middle of the card)

4.       Cut TWO pieces of the white or light cardstock 2½" x 4" (for the front and middle of the card)

5.       Cut the patterned paper:
        2" x 5⅜" (for the front or middle of the card)
        ½" x 5¼" (for the inside of the card)

6.       Fold and burnish the outside card and the card insert. Adhere the card insert onto the larger side of the outside card, positioning it centrally on the back, i.e. NOT placing the two folds snugly together.

7.       Adhere the larger piece of patterned paper to the front of the outside card. Alternatively you can adhere it to the back of that piece of cardstock, as shown in the photo on page 1.

8.       Adhere the smaller piece of patterned paper to the inside of the card, on the right-hand edge of the insert.

9.       Stamp your images or sentiments onto the small white cards. These can be the same on both, as shown in the photos on page 1, or they can be different, as shown in the examples below.

10.   Adhere the stamped cards to the mats of coordinating cardstock.

11.   Adhere one of the stamped cards onto the front of the middle card.

12.   Adhere the other stamped card onto the front card, lining it up to the same position as the one in the middle. Take care to only apply adhesive to one half of this piece otherwise you will stick the front and middle together.

13.  Embellish as desired.


Ellen Budden

Saturday, 3 February 2018

Double Z-Fold Card


My friend and fellow Stampin' Up! demonstrator has featured one of my cards in her blog and video this week. Jessie Holton has made her own version of the card so I thought I should give people the dimensions, etc, for the one I made. I have placed a link to Jessie's blog at the end of mine.


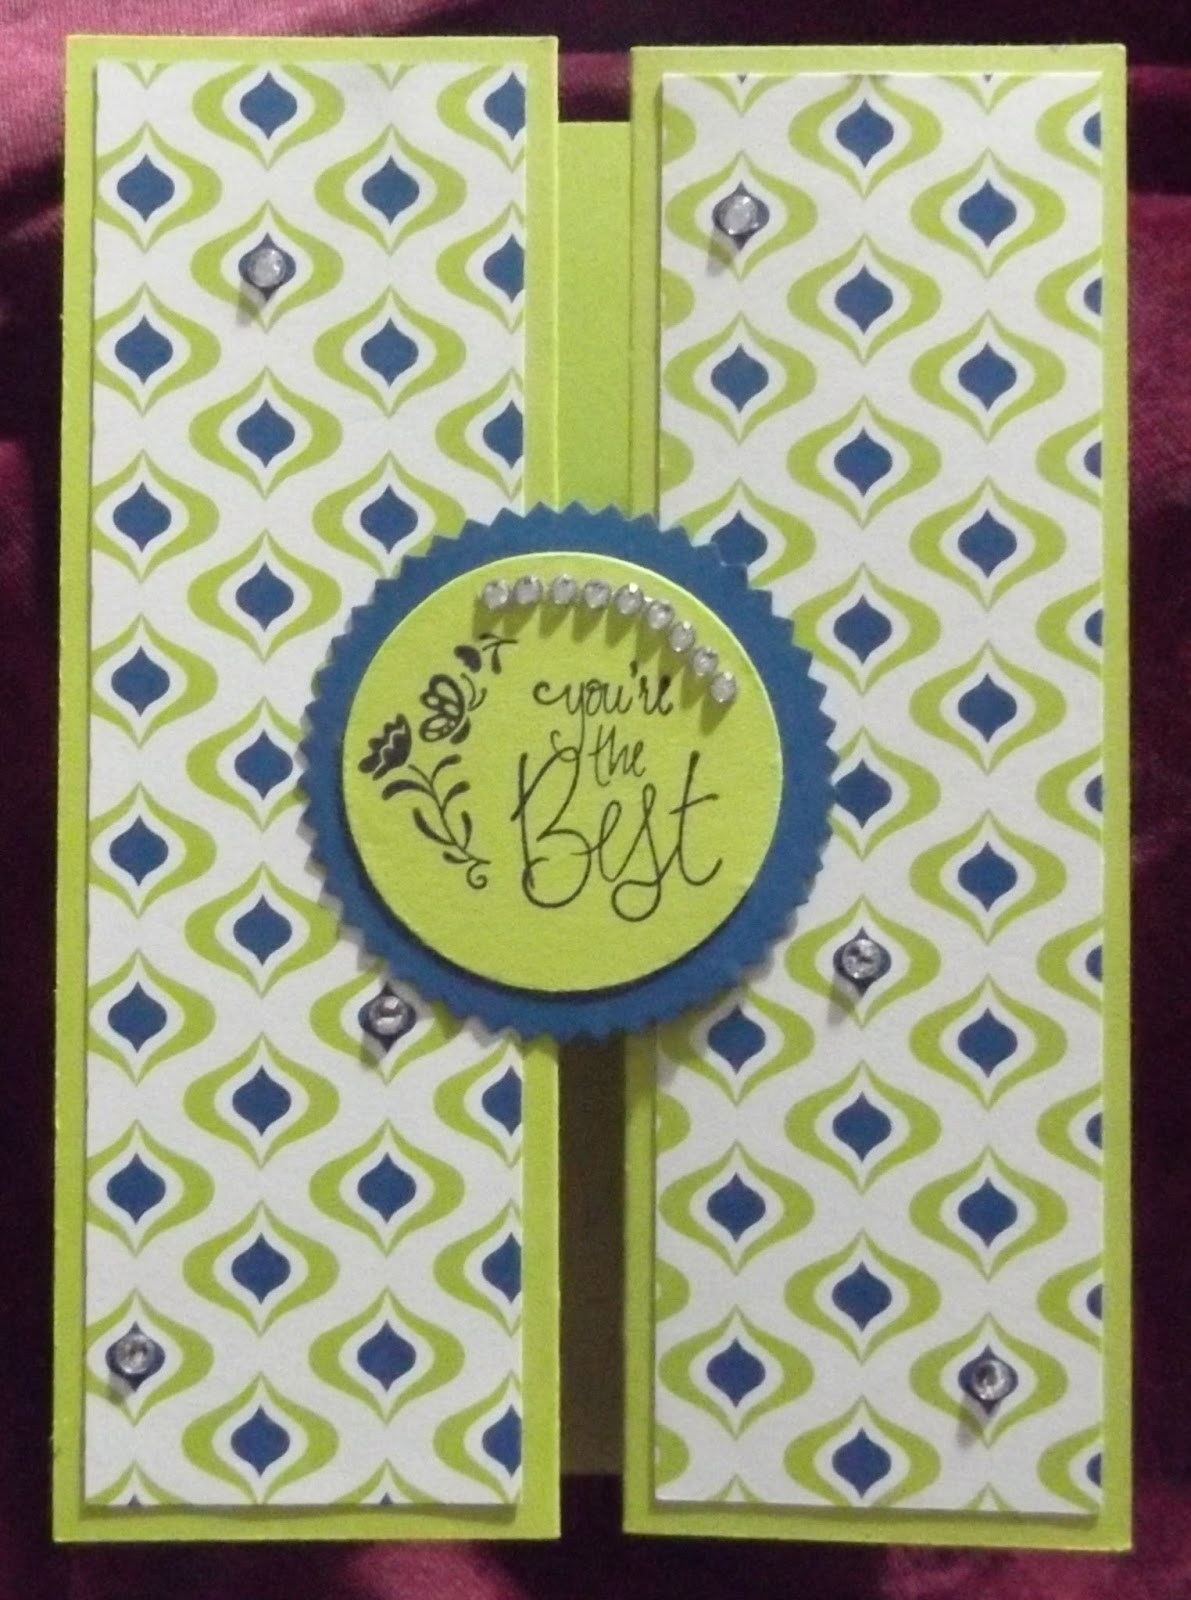
This is the card that I made and sent to Jessie. 

I know this card as a Double Z-Fold Card. I believe that it's also known as a Gate Fold Card, or Double Gate Fold Card. It's very easy to make and is a good one for beginner card makers.

Materials 

·         6" x 12" plain cardstock, for the card base
·         6" x 6" co-ordinating patterned paper #1 (I used Fresh Florals and Eastern Palace)
·         6" x 6" co-ordinating patterned paper #2
·         6" x 6" plain coordinating cardstock, to provide a surface inside the card for writing (optional, depending on the colour of the card base)
·         Rhinestones or other Embellishments

Equipment

·         Paper trimmer 
·         Bone folder 
·         PickTool 
·         Adhesive
·         Decorative dies and Big Shot or Decorative Punches
·         Stamps (I used Pretty Kitty and Beautiful You)
·         Ink pads to coordinate with your cardstock and paper

Instructions

1.       Score the base cardstock across the long edge at 2", 4", 8" and 10".


2.       Fold the 4" and 8" scores inwards (a valley fold), run bone folder along edges to get a crisp fold.

3.       Fold the 2" and 10" scores outwards (a mountain fold), use bone folder again.

4.       Cut two pieces 1¾" x 5¾" from each of the two coordinating paper (#1 and #2).

5.       Cut one piece 3¾" x 5¾" from the coordinating plain cardstock for the inside or simply stamp a greeting inside the card, if desired.

6.       Punch or die cut some shapes from paper #2 (i.e. the paper that is not going on the front panel), or labels from plain cardstock.

7.       Adhere all panels onto the card base, paper #1 on the front and paper #2 inside the card.

8.       Add the shapes and rhinestones, if desired, to the front of the card (i.e. the far left panel and the far right panel). 

Examples


Here are a couple of cards that I made back in 2015. The ingredients have since retired but they show how you can use punched or die-cut shapes to decorate the fronts of the cards


So, thanks again, Jessie, for featuring my card. Go Here to check out Jessie's blog and watch the video at the end.


Ellen Budden

Friday, 15 December 2017

Lots of Labels Z-Fold Card

This will probably be my last blog post for a couple of weeks. I'm sure you will all be too busy to be reading my blog. Thank you to those who HAVE been reading, though.

This card uses the Lots of Labels Framelits Dies and is quite stunning. All credit goes to Dawn Griffith whose video inspired me to make this card; the photos in the instructions are screenshots from Dawn's video - I will put a link to the video at the end of my instructions. Thank you, Dawn, for allowing me to share your card with my readers.


Dawn's Card - so pretty!

How the card looks when closed (sorry it's a bit blurry)

Materials

·         6" x 12" coloured cardstock (card base)
·         6" x 6" patterned paper (card front)
·         3" x 12" contrasting cardstock (fold mechanism)
·         6" x 6" plain cardstock (inside panels and front label; white, vanilla, or any other light colour cardstock)
·         Rhinestones or other embellishments, as desired
·         Optional: 2” of coordinating ribbon.

Equipment

·         Paper trimmer
·         Bone folder 
·         Adhesive
·         Lots of Labels Framelits Dies, or other similar nesting dies
·         Big Shot 
·         Stamps
·         Ink pads

Instructions

1.      Cut all of your cardstock/patterned paper as follows:
·         Card base: 4¼" x 11" and score at 5½".
·         Paper (card front): 4” x 5¼".
·         Fold mechanism: 2½" x 10” and score at 2” and 6”.
·         Inside panels (x 2): 3¾” x 2¼".
·         Front label: 3” x 5”

2.      Adhere the paper to the front of the card. Be sure to put some adhesive in the middle of the paper so that when the card front is die-cut the pieces will stay together.


3.      Use the largest size Lots of Label Framelits Die (4¾" x 2") to cut out a piece on the front of the card. Place the die centrally on the card front (but open the card so you only cut the front).

Centre the die

4.      Use the second largest Lots of Labels Framelits Die (4-1/16" x 2½") to cut out the front label for stamping using the 3” x 5” piece of plain cardstock. 


5.      Stamp the front label and inside panels as desired. One inside panel is for a stamped sentiment; the other is to write on; you can use them either way around.

6.      Adhere the inside panels to the two long sides of the fold mechanism. The photo below shows the front label as well, but it is not yet attached to anything).


7.      Adhere the front, stamped label to the die-cut piece from the front of the card.


8.      Lay the fold mechanism flat with the labels showing, then close the right-hand side so that the stamped panels are inside and the smaller flap is opened out (this will go to the front of the card); apply adhesive to the top pieces of the z-fold mechanism (these are the front and back of the piece). 

Add adhesive the two sides showing in the picture on the right

9.      Place the fold mechanism into the card, right up to the scored fold of the card. This will allow it enough room to open up without getting caught. 


10.      Close the card and hold down the little flap with your fingernail, then position the front die-cut into the hole on the front of the card. It will attach to the front of the fold mechanism. 


11.      Attach rhinestones or other embellishments, as desired.


12.      Optional: attach a small piece of ribbon to the left of the front label, using Glue Dots. This gives the recipient something to hold when opening the card. (See photos of the cards below).

Examples

This is the first one that I made - the colours look a lot better in real life.

I have made this one for my son's wedding next month.

It's a little tricky at first but is quite easy once you know what you're doing. If you would like to watch the video, click here: Dawn's Video

Thanks for reading, I wish you all a very Merry Christmas and a safe and healthy New Year.  I'd love to see photos of your cards. You can always post them (or any others) on my Facebook page: Country Craft.

See you next year!


Saturday, 9 December 2017

Artist Trading Cards (ATCs)

This is going to be a blatant ad for a group that I run on Facebook. This group is called PCA ATC Swap Group, an off-shoot of Paper Craft Addicts (PCA), a group that I inherited a while ago. Neither group is a Stampin' Up! group; indeed no buying, selling or recruiting is allowed in these groups. They're just a place to show off your creativity. 

So, what's an ATC? It's an Artist Trading Card (the blog title may have given it away already). Basically they are single cards (like a card front) measuring 2.5" x 3.5" and created to a theme. Participants make enough copies so that everybody gets one, usually a minimum of 6; 9 is a good number because then you have full page of ATCs if you're storing them in trading card sleeves - more on that later. Generally it's no more than 9, unless there are more than 9 participants and you want one of everybody else's. Each person keeps one copy for themselves and posts the rest to me with a stamped self-addressed envelope. Once I receive all of the ATCs for that month, I sort them so that each person gets one of everybody else's ATCs, then I mail them back. Sounds complicated, but it's not really.

Our group has a different theme each month, and every few months we add an extra challenge of using a particular technique or material or whatever. The ATC swap has been going since August 2014 and we've had quite a few themes/techniques/people over the years. I won't bore you with all of them, but I will show you the ones I made this year. We put the group on hold in August this year due to low numbers of participants, but we're going to start it up again for January, so I hope some of you out there might like to give it a go next year (that's why this is an ad).


January                    February                     March

January 2017 - School. I used SU Black Chalkboard cardstock (long retired but I am a hoarder) and I wrote on it with a Chalk Marker (the first SU thing I ever bought, back in 2013!). I glued some strips of Kraft cardstock around the outside and used a corner punch. It's supposed to be an old-fashioned school slate.

February 2017 - Fashion. Some of you will recognise one of the Beautiful You stamps. I used the Watercolour Pencils to colour the dress and hat, die cut an oval, then foam mounted it over two mats and finished off with a gold star.

March 2017 - Teddy Bear (added challenge: monochrome). I printed out a cute teddy bear image from the Internet, coloured it with Watercolour Pencils and SU Blendabilities then foamed-mounted it on a background of DSP. I added a few little bling spots as well. Monochrome was harder than I thought it would be!

April                     April (#2)                      May

April 2017 - Crime. This one was fun. I printed out all of the elements and fussy cut where necessary. I used Crystal Effects on the magnifying glass to give it a glass-like effect. Unfortunately someone pulled out of this month, at the last minute, so I made an extra set. I printed out the background (combining the top of a book and a photo of Agatha Christie's books), then printed out two more book covers (Murder on the Orient Express & Death on the Nile) and foam mounted them over the corresponding image in the larger picture. It was a pretty basic ATC, but I didn't have a lot of time for this one.

May 2017 - Fairies. Stamped the image from the Fairy Celebrations stamp set and then coloured it using ink and an Aqua Painter. Added some bling to finish it off.

  June                           July                         August

June - Landmarks (added challenge: map background). I printed pictures of landmarks and added country and 'postage' information to each. I used the retired Stamp Punch to punch them out and foam mounted them onto a map background. I really like this one, if I do say so myself, lol.

July - Snowmen. I chose this theme because we really don't get to celebrate snow very often in Australia, and it was Winter at the time. I punched three different sized circles and added some pale blue ink to them (using a sponge dauber - doesn't really show in the photo). Glued the circles onto the ATC, added some facial features and buttons, drew a mouth and arms, and voila!

August - Hats. Stamped the hats from the Guy Greetings stamp set in different colours, then foam-mounted the sentiment.

So, as you can see, you can make a big effort, or keep it simple, it's really up to you. The thing I really enjoy about ATCs is seeing how different people interpret the theme. It's quite interesting.

Here are just some of the group photos...


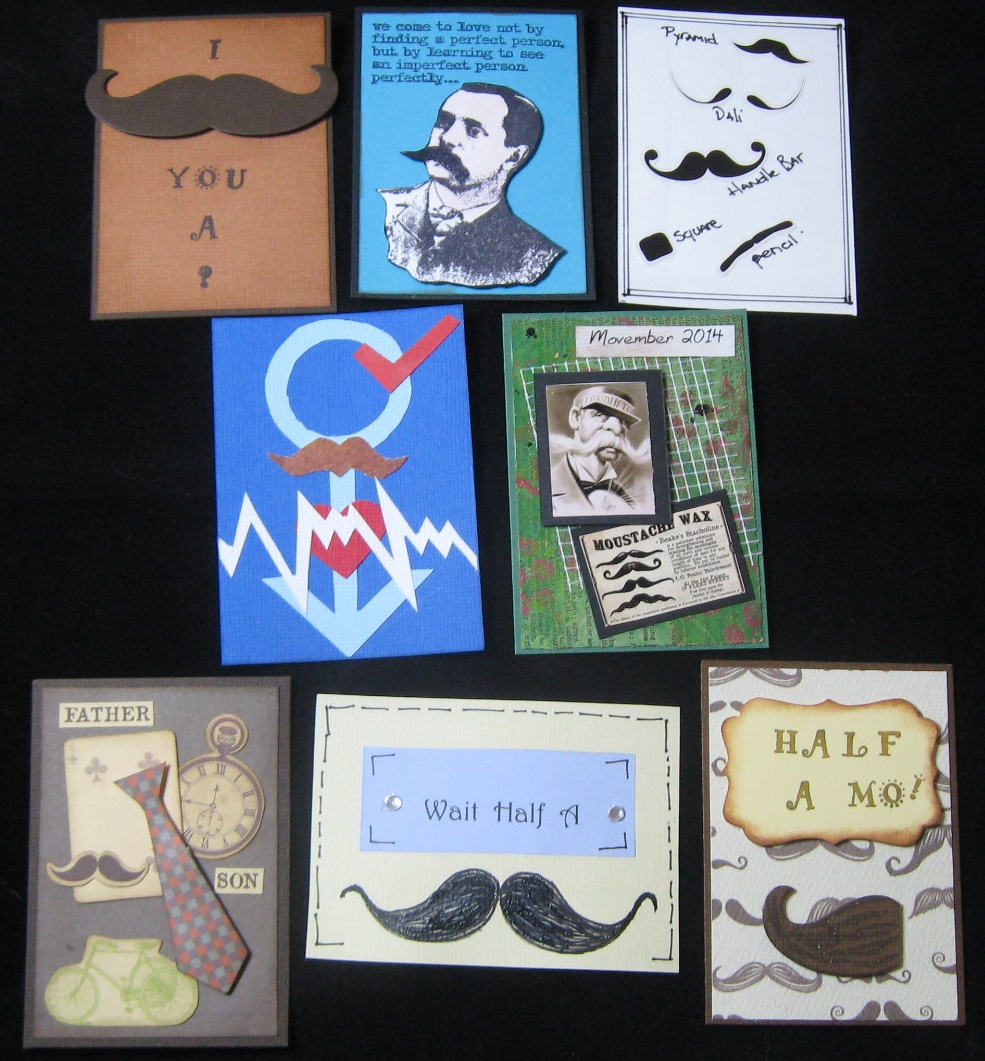
November 2014 - Movember
These were fun - mine is the "Half a Mo" on the lower right.

June 2015 - Royalty (with lace)
Such a variety here. Mine is the purple one in the middle of the bottom row, I used a stamp for my lace component.

January 2016 - Summer
Really bright and summery! Mine is top right, with the shells.

Now, I hear you asking, "But what do I do with all these ATCs?" Good question. Some people (like me) put them into trading card sleeves (like footy cards) and keep them in an album - it's great for ideas and techniques. Others use them to make cards. I made an extra couple in February this year so I turned them into cards. One person gave some of hers to the local school to use however they saw fit.


 Our group is only available to Australia residents, due to time and postage constraints. If you live in Australia and would like to join our little group, please let me know. You don't have to participate EVERY month, you can come and go as you please. Hopefully I will see some of YOUR ATCs soon!

Saturday, 2 December 2017

OnStage Local, Melbourne, November 2017

Kieran and I had a very busy month in November. We started off by travelling to Adelaide for my future daughter-in-law's Hens Day/Night. The next day we drove to Melbourne for a week of visiting relatives, seeing The Book of Mormon (very, very funny) and Aladdin (for the second time this year) and culminating in Stampin' Up!'s OnStage Local. It was the first time for both of us and we had a ball! Lots of presentations of new products coming in January, plus the Sale-A-Bration goodies for next year as well.

It started off with a video presentation from Salt Lake City in Utah where OnStage Live was happening, then plenty of exciting new 'toys' coming soon. There were Prize Patrols plus other freebies including a cool bag and even a special coffee mug.

This is me with my Prize Patrol prize.
We weren't allowed to show the actual item until later

This is the cool coffee mug

 We had a yummy lunch followed by the opportunity to play with some of the new toys! First off we decorated a sweet little giftbox, and made a card.


These Silver Mini Gable Boxes will come in a pack of 10. They come flat but are very easy to 'construct'. We used Sweet Soiree Specialty DSP (lots of foil highlights on the papers) and the Cake Soiree Stamp Set.


This is a fun new suite. It uses the Bubble Over Stamp Set, Bubbles & Fizz DSP and Bottles & Bubbles Framelit Dies. The stamp set and dies will be available as a bundle with a 10% saving.

 We watched some more product demonstrations (some by video and some live) and then got to play again. This time we made some tags and another card.

I love this suite! The Fruit Basket Stamp Set and Itty Bitty Fruit Punch Pack (both available as a bundle, 10% off) and the Tutti Frutti 6" x 6" DSP. I was very fortunate and excited to come home with this bundle.

This card used the Petal Palette Stamp Set, Petal Passion DSP, Petal Passion Embellishments (cute metal leaves and flowers) and Whisper White Organza Ribbon.

 After we got back home to Woomera, I had some more play-time with some of the new items that we were given at OnStage or that we bought straight after (a benefit only available to OnStage attendees).

It's the Tutti-Frutti bundle again (stamp set plus a pack of 4 mini punches). I stamped the fruit onto a plain piece of Whisper White cardstock then punched out a few pieces and foam-mounted them with Dimensionals. So, so cute! The sentiment is also part of the set and I used the Duet Banner Punch (141483).

Another card using the Bubbles/Bottles bundle. The food is from the Fruit Basket Stamp Set and Picnic With You Stamp Set. The sentiment is from the Picture Perfect Stamp Set, coupled with the Everyday Label Punch (144668) and the Starburst Punch (143717), both of which are available now. I added some Lemon Lime Twist Mini Striped Ribbon as well.

This one uses the Bottles/Bubbles bundle and Lemon Lime Twist ribbon as well, plus the Pretty Label Punch (143715). The sentiment is from the Picture Perfect Stamp Set again.

Thanks for reading!