Wednesday, 17 April 2019

OnStage Live, Auckland, NZ


 Kieran and I had the pleasure of attending OnStage Live in Auckland, NZ, last week. We had a fantastic time: meeting people in person that we've known online for ages, catching up with some that we'd met previously, seeing the new catalogue and new products, having the chance to play with some of the new products, and doing some serious swapping!! I made 51 swaps to take with me and ran out in just a couple of hours. I received some seriously gorgeous swaps in return and I will get some photos and show you all a little bit later. For today I wanted to share MY swaps and how I made them.

But before we get into that, a couple of photos from OnStage...

We sat right behind Shelli and Sterling Gardiner. Shelli is, of course, one of the founders of Stampin'Up!

We were able to get a photo with Shelli and her daughter, Sara Douglass, current CEO of Stampin'Up! Both are really lovely ladies, very friendly and gracious.

I finally got to meet my SU 'Mum"in person! The remarkable Kylie Bertucci.

Kylie's Crazy Crafters

My swaps were emery board sleeves. Each sleeve holds two different sized emery boards. I bought the emery boards on eBay and was able to get a variety of colours for the smaller ones.


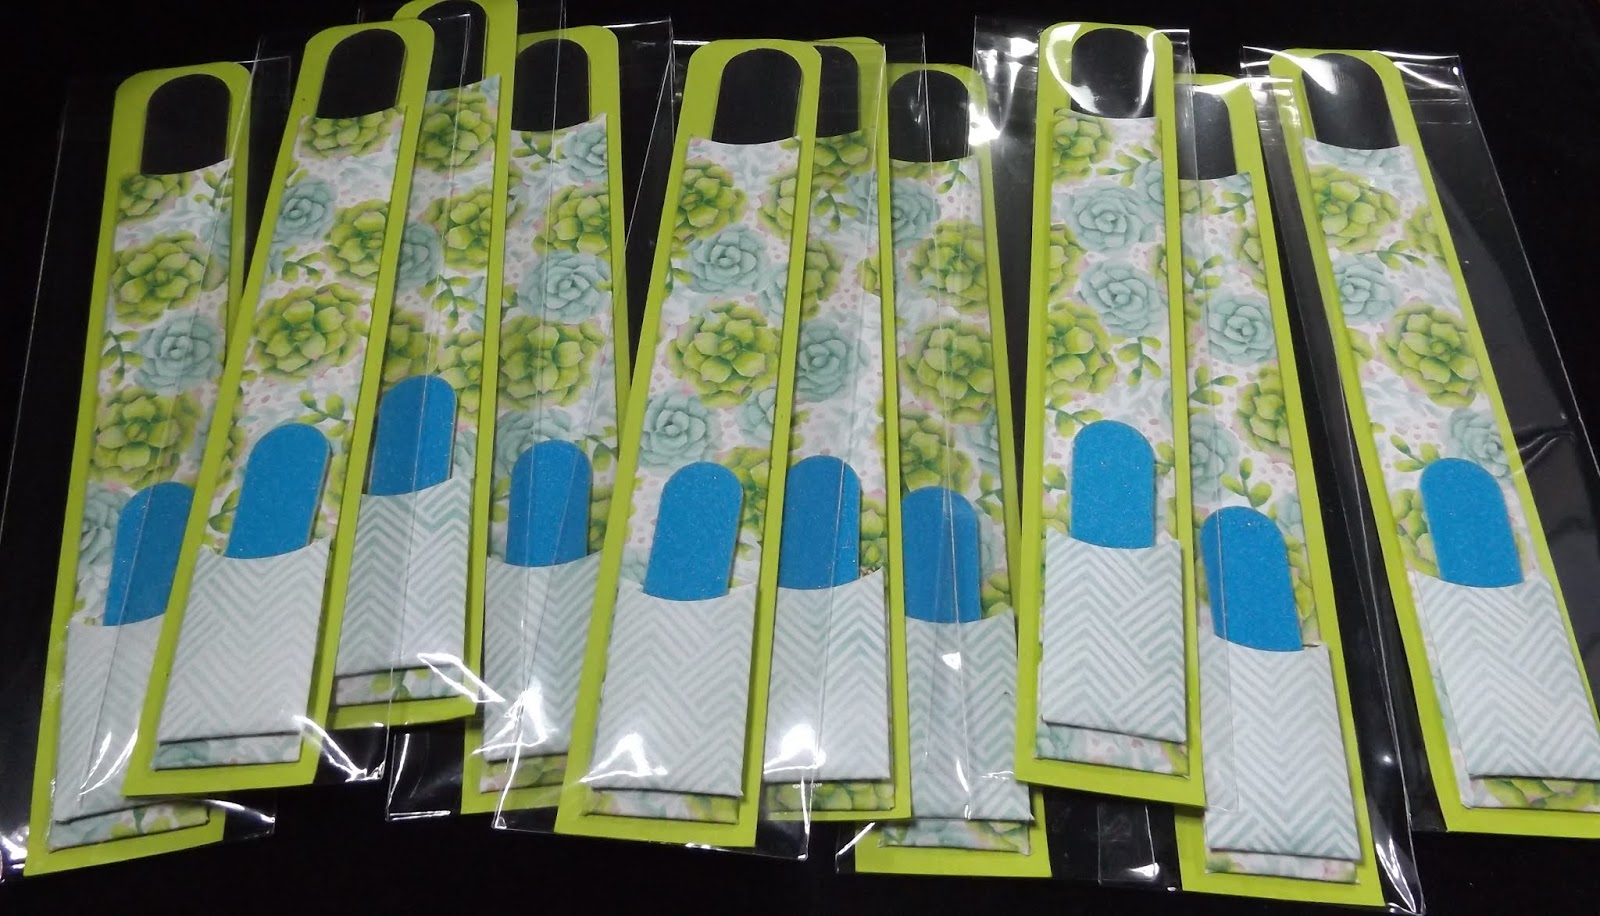
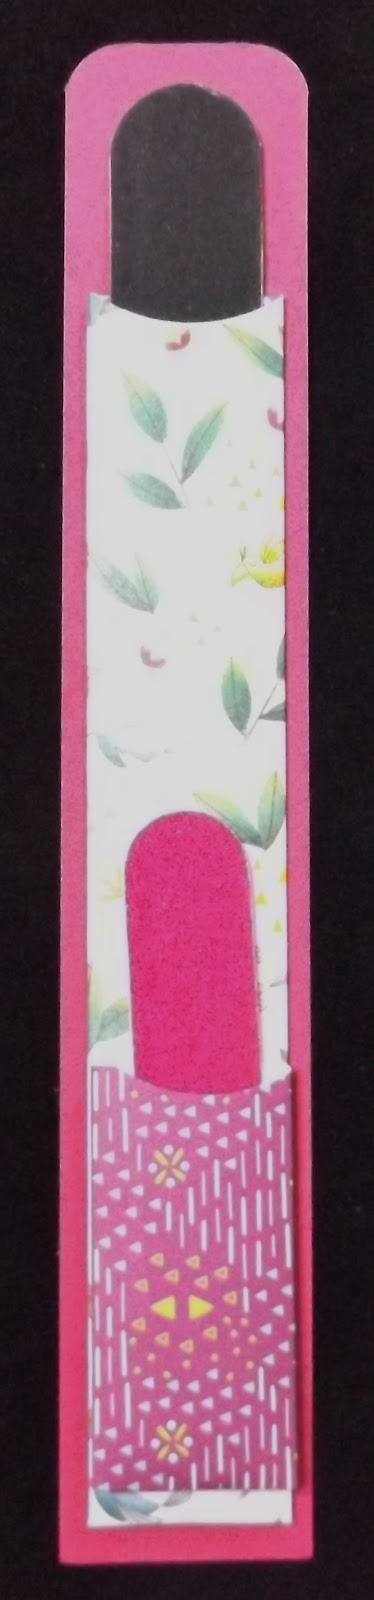
This is the one I have used for the instructions - the short emery board is a little longer than the ones in most of my swaps.


Materials

·       Plain Cardstock in a colour that matches your emery boards
·       2 pieces of Designer Series Paper (DSP) in contrasting colours/designs
·       2 Emery boards; 1 long one and 1 short one
·       Adhesive, Multipurpose Liquid Glue may be the best

Equipment

·       Stampin’ Trimmer
·       Bone folder
·       Paper Snips
·       Circle Punch (I used a 1¾“ Circle Punch, but almost any circle punch will work)
·       Corner Punch (there’s one on the Detailed Trio Punch or the Envelope Punch Board)

Instructions

NB The emery boards that I’ve used here measure 7” x ¾” (black) and 3” x ” (pink). You may need to adjust the measurements according to the size of the emery boards that you have.

1.      Cut a piece of plain cardstock 7½“ x 1¼”.

2.      Use a corner punch to round the corners at one thin end.    


3.      Cut a piece of DSP 6½“ x 2¼”, then score at ½“ on the bottom edge, ½“ on one long side and ¾” on the other long side.

4.      Cut a piece of coordinating DSP 2½” x 2¼” and score at the same measurements as the large DSP piece. 

5.      Fold and burnish all score lines.

6.      On each piece of DSP, use a circle punch and cut out an arc in the centre of the DSP at the top.


7.       Cut out the corner pieces at the bottom of each piece of DSP. Cut on a slight angle into the corners (see photo).

8.      Glue the sleeves:
a.      Fold the ¾“ side across and glue the ½“ side on top. This leaves the wider piece inside the sleeve with less chance of the emery board catching.
b.      Fold and glue the bottom side last, so the emery board can slide all the way to the bottom.

9.      Glue the large sleeve to the plain cardstock (with the rounded corners at the top). Place it about 1/8 “ from the bottom.

10.  Glue the small sleeve on top of the large sleeve, at the bottom – you can position it flush with the large sleeve or move it up just a little as I have done in this photo.
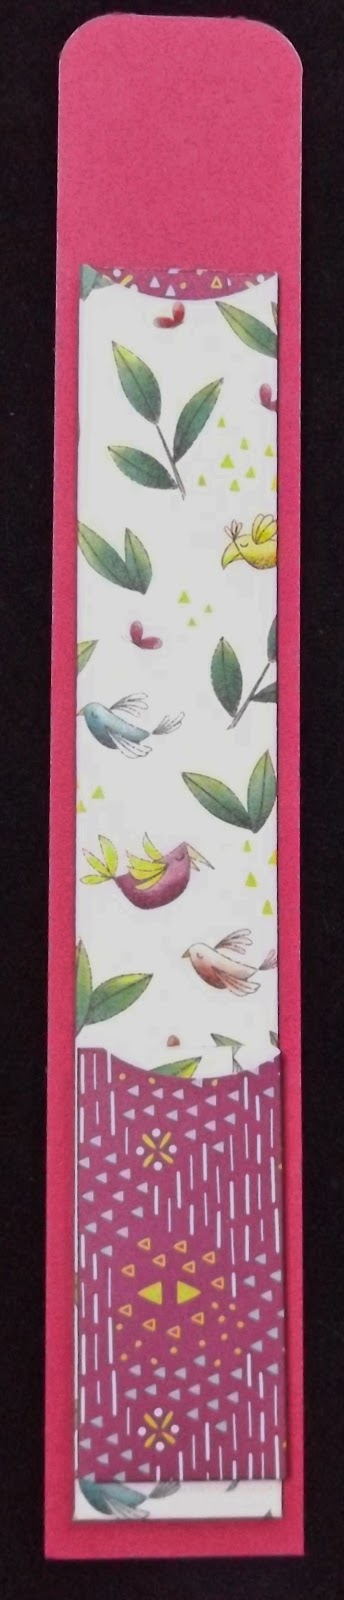

11.  Slide the emery boards into the sleeves.

12.  You could add embellishments or ribbon if you wish, but they may not ‘wear’ well if the sleeve is placed into a handbag or similar.

13.  I finished mine off with a couple of stickers on the back.


Most of the ones I swapped were made with a slightly smaller coloured emery board that measured 2¼“ x “ and I cut the small DSP 2” x 2¼“. 

Thanks for visiting. Happy crafting!


Sunday, 31 March 2019

Joy Fold Card


Hi folks. It's been a couple of busy weeks. My younger son's wife gave birth to our newest grandson, Caleb, and we travelled down to meet him last weekend. So tiny and so soft. Very well done, Luke and Bek!


Anyway, back to craft. We had a class scheduled but for two weeks nobody showed up (for various reasons). We finally got to it last week and it was so quick and easy that the ladies had it done and dusted very early.

This is a cute card that contains a card within a card. You'll see what I mean as we go through the instructions.

Equipment

  • Paper Trimmer
  • Bone Folder
  • Adhesive
  • Stamps 
  • Ink pads
  • Punches or Dies for a label

Materials

  • A4 Cardstock for card base
  • Contrasting cardstock for second base piece
  • Coordinating patterned paper (three different designs will look best)
  • Additional cardstock for labels (same colour as the base, or same as the small flap; or use any other neutral or coordinating colour)
  • Embellishments, as desired

Instructions

1.      Cut large card base from A4 cardstock 4¼" x 8½", score at 5½".

2.      Cut small card base from half-A4 cardstock 3" x 8", score at 4"

3.      Cut three panels, each from a different patterned paper
       a.      4" x 5¼" [Piece A]
       b.      2¾" x 4" [Piece B]
       c.      2¾" x 3¾" [Piece C]


4.      Adhere Piece A inside the main card base.

  
5.    Adhere Piece B to the main card front. If you want, you could cut another of Piece B and adhere it to the back of the same flap.


6.   Adhere Piece C to the front of your small card base, ensuring that the patterned paper is placed to the left of the fold (as in the photo below).


7.   Add adhesive to the back of your small card base and place it on the inside of the large card base. Make sure the fold of the small card base is positioned to the right. The positioning can be varied according to taste. I placed mine in the centre but you could position it further to the right if you want to.

   
8.    If your small card base is dark, cut a piece of white, vanilla, or other light coloured cardstock 2¾" x 3¾" and adhere inside the small card base.


9.   Embellish your card as desired using stamps, dies/punches, etc.

This card can also be made in portrait orientation as well. For this one I positioned the small card a little higher (i.e. further to the right if it was in landscape mode). 


My daughter, Kieran, and I are off to Auckland in a week or so to attend OnStage Live, a 3-day event for Stampin' Up! demonstrators. Full report when we get back. In the meantime... Happy crafting!

Thursday, 21 February 2019

Post-It Note Organiser

Our Craft Group had a change from cards this week. We made a Post-It Note Organiser.

Stamped images (c) Stampin' Up!

As usual I made up some kits for the ladies, but I wasn't able to take photos of their finished products, sorry.

Anyway, here are the instructions if you'd like to try your hand at this.

Materials

·       Solid Colour A4 Cardstock
·       Contrast Colour A4 Cardstock
·       Patterned Paper
·       Elasticised ribbon/trim, or plain elastic if necessary
·       76cm x 76 cm Post-It Note pad (split into two pads to make two organisers)
·       35cm x 58 cm Post-It Note pad (split into two pads also)
·       Pencil (half-size) - I got ours from Winc online
·       Glue or double-sided tape
·       Embellishments: Washi Tape, ribbon, rhinestones, flowers, stickers or whatever you choose.

Equipment

·       Stampin' Trimmer 
·       Any oval or circle punch

Instructions

Cover

  1. Cut a piece of plain cardstock measuring 8" x 5½". Score at 3¾" from each short edge.               
      
  2. Cut a piece of patterned paper 3½" x 3¼". Adhere to the front of the cover at the bottom. 
  1. Add a piece of the elasticised ribbon across the top of the patterned paper but be sure you don't stretch it. If you don't have the Ruffle Trim that I used (it retired a very long time ago), you can use regular ribbon or Washi Tape or even a thin piece of contrast cardstock.


  1. Inside the holder, attach a piece of elasticised ribbon (or plain elastic) on the inside-back of the cover to hold the pencil in place. Place it about 1½" from the top and put the glue as close to the score line as possible. Use the pencil to determine the correct size.                                                
  
  1. Cut a piece of contrasting cardstock 3½" x 5¼". Decorate the corners with small stamps or pieces of Washi Tape, bling, flowers, stickers or other embellishment, if desired. Glue to the inside back cover.                                                                                                                                                
  2. Split the pad of larger Post-It notes in half and glue it into place. Do the same again with the smaller pad below.


Pocket

  1. Using the same patterned paper as on the front cover, cut a piece 6" x 4". Score at ½" on both short sides and one long side. Fold along each of the score lines, folding the bottom first, then the two sides. Snip each corner as shown to avoid a bulky corner.
    This shows the wrong side of the patterned paper (and I had already done Step 2 as well).

  2. Use an oval or circle punch to punch a half-oval/half-circle from the top edge, i.e. the edge that wasn't scored.                            
  3. On the back, apply glue to all three folded pieces and attach it to the front inside cover, with the cut-out to the left.
    Oops! I put the pocket on the wrong way around. It's easier to use if the opening faces to the left.

Finishing Off

  1. You can add a stamped greeting to the front cover or to the inside the Organiser instead of a smaller pad.                                                                                                                                                    

  1. Decorate the front with butterflies or other embellishments.

And there you have it. It's not hard at all, but looks amazing. Makes great gifts for friends and relatives, or might sell well on market stalls.

Happy crafting!

Tuesday, 5 February 2019

Starburst Card

This week our craft group tackled a Starburst Card. I made a couple ahead of time as examples, and then made another one on the night as a demonstration.

Using Garden Impressions 6" x 6" DSP
Using How Sweet It Is DSP

The instructions will tell you to cut up some patterned paper to make these cards, but it's also a great way to use up leftover scraps.

This is the one I made tonight, using How Sweet It Is Designer Series Paper left over from my card making efforts during my recent Online Party. 


The ladies in the Craft Group all made theirs using Garden Impressions 6" x 6" Designer Series Paper (I made up some kits beforehand). People swapped some of their patterned paper strips and all ended up with some pretty cool designs.


Top: Heather, Amanda and Samantha
Bottom: Kieran and Dot
And now for some instructions...

Materials

·       1 x A4 plain cardstock (card base)
·     2 x half-A4 coordinating cardstock (mats and labels)
·      4" x 6" plain cardstock (card topper)
·       3 pieces 6" x 6" Patterned Paper
·       Adhesive, e.g. Multipurpose Adhesive Sheets and/or Multipurpose Liquid Glue, plus some Tear & Tape or Snail Adhesive for the mats
·       Foam Dimensionals, optional

Equipment

·       Stampin' Trimmer 
·         Bone folder 
·         Stamps
·         Ink pads
·        1⅜" Scallop Circle Punch 
·       1¾" CirclePunch

Instructions

1. Cut your plain A4 cardstock in half (5⅞”) and score at 4" to form the card base. Burnish fold with a Bone Folder.

2. Cut a coordinating piece of plain cardstock 3¾“ x 5½“ for Mat 1.  Punch out a 1¾" circle and put it aside, then adhere the mat to the card base. The hole won't be seen once you put the card together.

3. Cut another coordinating piece of cardstock 3½" x 5¼ for Mat 2. Stamp a sentiment and punch out a 1" scalloped circle and put it aside, adhere the mat to the card base.

4. Cut a piece of plain cardstock 3¼" x 5" for your card topper. You can use any scrap piece of cardboard for this as none of this piece will be visible on the final card. I used some of the plain  cardboard that comes with the 12" x 12" patterned paper.


5. Cut your patterned paper 3½" to 5" wide across the long side (you can vary it), then cut them into varying width strips approximately 1" - 1½" wide (they'll be 3½" to 5" long). They don't have to be exactly even. You can use both sides of the patterned paper to create more variety on your card, or even use plain cardstock. 

6. Cut each strip into two triangles by cutting from one corner to the diagonally opposite corner.


7. Cover the card topper with glue, or use a Multipurpose Adhesive Sheet cut to size (much less messy and heaps easier to use without the glue drying out, etc.).

8. Chose a 'central' point on your card topper (it doesn't have to be in the centre of it though) and start placing your patterned paper triangles on the topper, alternating strips around the card. The pieces don't have to be even or in the same order all the way around. Continue until you have covered the whole card topper. You can trim the last piece to fit, if needed.

Start anywhere on the cardboard 

Work around the cardboard until it's completely covered

9. Turn the card topper over and trim away the overhanging pieces of patterned paperYour scissors may get very sticky if you make a few of these cards, just clean them off with an alcohol wipe – but don’t cut yourself!

Trim away all overhanging patterned paper

You'll be left with a card topper that looks like this

11. Glue your two circles together and, using foam dimensionals, place them over the 'centre' of the starburst. You can use anything in the centre, it doesn't have to be circles. You can use any shapes, or labels. 

I only used a single Starburst Punch label for this one.

This technique allows for all sorts of pretty pieces - you can make them monochrome or as colourful as you like.

Happy crafting!

Sunday, 3 February 2019

Gingham Gala

My daughter, Kieran, and I have had a girls' crafting weekend, so this afternoon I had a go with the Gingham Gala 6" x 6" Designer Series Paper. I am very happy with the results today.

Images (c) Stampin' Up!


These more or less monochrome cards show off the colours better, I think. I have made similar before and any patterned paper would work, but the Gingham Gala is perfect for this, plus I got to play with my Stampin' Blends again. I made two of each card.

I used the So Hoppy Together Stamp Set on this card.


Just Because Stamp Set is a really nice one that grows on me more and more. I think this card is my favourite of today's batch, probably because of the Highland Heather - purple is my favourite colour.


The last three all use the Fable Friends Stamp Set. It's so cute.


Here are the dimensions.

Card base: Half Australian A4 sheet, so measures 5⅞" x 8¼", scored at 4⅛" 
Whisper White: 5½" x 2¼"
Patterned Paper: 5¼" x 2"

The stamped piece was just cut at a suitable size and the mat is ½" longer and wider, giving a ¼" border all around. 

Anyway, that's all for today.

Happy crafting!