Thursday, 21 February 2019

Post-It Note Organiser

Our Craft Group had a change from cards this week. We made a Post-It Note Organiser.

Stamped images (c) Stampin' Up!

As usual I made up some kits for the ladies, but I wasn't able to take photos of their finished products, sorry.

Anyway, here are the instructions if you'd like to try your hand at this.

Materials

·       Solid Colour A4 Cardstock
·       Contrast Colour A4 Cardstock
·       Patterned Paper
·       Elasticised ribbon/trim, or plain elastic if necessary
·       76cm x 76 cm Post-It Note pad (split into two pads to make two organisers)
·       35cm x 58 cm Post-It Note pad (split into two pads also)
·       Pencil (half-size) - I got ours from Winc online
·       Glue or double-sided tape
·       Embellishments: Washi Tape, ribbon, rhinestones, flowers, stickers or whatever you choose.

Equipment

·       Stampin' Trimmer 
·       Any oval or circle punch

Instructions

Cover

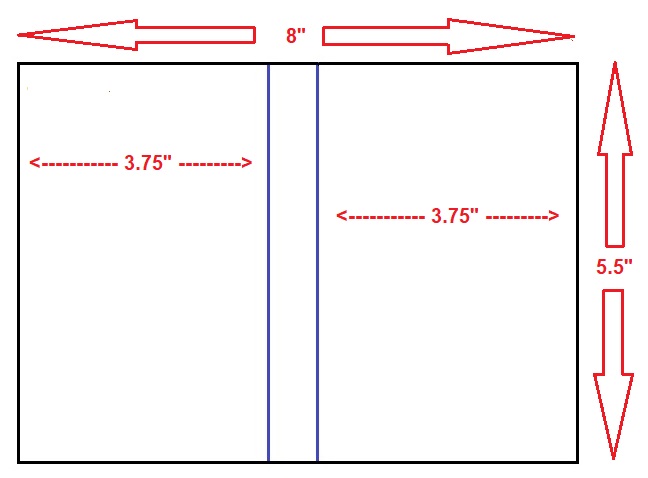
  1. Cut a piece of plain cardstock measuring 8" x 5½". Score at 3¾" from each short edge.               
      
  2. Cut a piece of patterned paper 3½" x 3¼". Adhere to the front of the cover at the bottom. 
  1. Add a piece of the elasticised ribbon across the top of the patterned paper but be sure you don't stretch it. If you don't have the Ruffle Trim that I used (it retired a very long time ago), you can use regular ribbon or Washi Tape or even a thin piece of contrast cardstock.


  1. Inside the holder, attach a piece of elasticised ribbon (or plain elastic) on the inside-back of the cover to hold the pencil in place. Place it about 1½" from the top and put the glue as close to the score line as possible. Use the pencil to determine the correct size.                                                
  
  1. Cut a piece of contrasting cardstock 3½" x 5¼". Decorate the corners with small stamps or pieces of Washi Tape, bling, flowers, stickers or other embellishment, if desired. Glue to the inside back cover.                                                                                                                                                
  2. Split the pad of larger Post-It notes in half and glue it into place. Do the same again with the smaller pad below.


Pocket

  1. Using the same patterned paper as on the front cover, cut a piece 6" x 4". Score at ½" on both short sides and one long side. Fold along each of the score lines, folding the bottom first, then the two sides. Snip each corner as shown to avoid a bulky corner.
    This shows the wrong side of the patterned paper (and I had already done Step 2 as well).

  2. Use an oval or circle punch to punch a half-oval/half-circle from the top edge, i.e. the edge that wasn't scored.                            
  3. On the back, apply glue to all three folded pieces and attach it to the front inside cover, with the cut-out to the left.
    Oops! I put the pocket on the wrong way around. It's easier to use if the opening faces to the left.

Finishing Off

  1. You can add a stamped greeting to the front cover or to the inside the Organiser instead of a smaller pad.                                                                                                                                                    

  1. Decorate the front with butterflies or other embellishments.

And there you have it. It's not hard at all, but looks amazing. Makes great gifts for friends and relatives, or might sell well on market stalls.

Happy crafting!

Tuesday, 5 February 2019

Starburst Card

This week our craft group tackled a Starburst Card. I made a couple ahead of time as examples, and then made another one on the night as a demonstration.

Using Garden Impressions 6" x 6" DSP
Using How Sweet It Is DSP

The instructions will tell you to cut up some patterned paper to make these cards, but it's also a great way to use up leftover scraps.

This is the one I made tonight, using How Sweet It Is Designer Series Paper left over from my card making efforts during my recent Online Party. 


The ladies in the Craft Group all made theirs using Garden Impressions 6" x 6" Designer Series Paper (I made up some kits beforehand). People swapped some of their patterned paper strips and all ended up with some pretty cool designs.


Top: Heather, Amanda and Samantha
Bottom: Kieran and Dot
And now for some instructions...

Materials

·       1 x A4 plain cardstock (card base)
·     2 x half-A4 coordinating cardstock (mats and labels)
·      4" x 6" plain cardstock (card topper)
·       3 pieces 6" x 6" Patterned Paper
·       Adhesive, e.g. Multipurpose Adhesive Sheets and/or Multipurpose Liquid Glue, plus some Tear & Tape or Snail Adhesive for the mats
·       Foam Dimensionals, optional

Equipment

·       Stampin' Trimmer 
·         Bone folder 
·         Stamps
·         Ink pads
·        1⅜" Scallop Circle Punch 
·       1¾" CirclePunch

Instructions

1. Cut your plain A4 cardstock in half (5⅞”) and score at 4" to form the card base. Burnish fold with a Bone Folder.

2. Cut a coordinating piece of plain cardstock 3¾“ x 5½“ for Mat 1.  Punch out a 1¾" circle and put it aside, then adhere the mat to the card base. The hole won't be seen once you put the card together.

3. Cut another coordinating piece of cardstock 3½" x 5¼ for Mat 2. Stamp a sentiment and punch out a 1" scalloped circle and put it aside, adhere the mat to the card base.

4. Cut a piece of plain cardstock 3¼" x 5" for your card topper. You can use any scrap piece of cardboard for this as none of this piece will be visible on the final card. I used some of the plain  cardboard that comes with the 12" x 12" patterned paper.


5. Cut your patterned paper 3½" to 5" wide across the long side (you can vary it), then cut them into varying width strips approximately 1" - 1½" wide (they'll be 3½" to 5" long). They don't have to be exactly even. You can use both sides of the patterned paper to create more variety on your card, or even use plain cardstock. 

6. Cut each strip into two triangles by cutting from one corner to the diagonally opposite corner.


7. Cover the card topper with glue, or use a Multipurpose Adhesive Sheet cut to size (much less messy and heaps easier to use without the glue drying out, etc.).

8. Chose a 'central' point on your card topper (it doesn't have to be in the centre of it though) and start placing your patterned paper triangles on the topper, alternating strips around the card. The pieces don't have to be even or in the same order all the way around. Continue until you have covered the whole card topper. You can trim the last piece to fit, if needed.

Start anywhere on the cardboard 

Work around the cardboard until it's completely covered

9. Turn the card topper over and trim away the overhanging pieces of patterned paperYour scissors may get very sticky if you make a few of these cards, just clean them off with an alcohol wipe – but don’t cut yourself!

Trim away all overhanging patterned paper

You'll be left with a card topper that looks like this

11. Glue your two circles together and, using foam dimensionals, place them over the 'centre' of the starburst. You can use anything in the centre, it doesn't have to be circles. You can use any shapes, or labels. 

I only used a single Starburst Punch label for this one.

This technique allows for all sorts of pretty pieces - you can make them monochrome or as colourful as you like.

Happy crafting!

Sunday, 3 February 2019

Gingham Gala

My daughter, Kieran, and I have had a girls' crafting weekend, so this afternoon I had a go with the Gingham Gala 6" x 6" Designer Series Paper. I am very happy with the results today.

Images (c) Stampin' Up!


These more or less monochrome cards show off the colours better, I think. I have made similar before and any patterned paper would work, but the Gingham Gala is perfect for this, plus I got to play with my Stampin' Blends again. I made two of each card.

I used the So Hoppy Together Stamp Set on this card.


Just Because Stamp Set is a really nice one that grows on me more and more. I think this card is my favourite of today's batch, probably because of the Highland Heather - purple is my favourite colour.


The last three all use the Fable Friends Stamp Set. It's so cute.


Here are the dimensions.

Card base: Half Australian A4 sheet, so measures 5⅞" x 8¼", scored at 4⅛" 
Whisper White: 5½" x 2¼"
Patterned Paper: 5¼" x 2"

The stamped piece was just cut at a suitable size and the mat is ½" longer and wider, giving a ¼" border all around. 

Anyway, that's all for today.

Happy crafting!


Tuesday, 1 January 2019

Happy New Year

Happy New Year to my millions of readers! OK, that may be a slight exaggeration, haha. But if you're reading this then know that I'm talking to YOU.

Our craft group is on a break right now, but I wanted to share a 'thing' with you. It's probably best described as a toy - my granddaughter calls it a cake, for obvious reasons.


It's very simple to make and involves no glue at all. All you need are 8 sheets of paper; I used four of the five colours from the 2018-2020 In Color 6" x 6" Designer Series Paper. This version of patterned paper is available in all of the colour families and is perfect for quick cards or projects like this one.

Materials

8 sheets of 6" x 6" patterned paper (you could use larger or smaller sheets to make larger or smaller versions).

Equipment

Just your hands, and perhaps a Bone Folder.

Instructions

1. Take one sheet of paper and fold diagonally in both directions, then open flat again.

2. Turn the sheet over and fold in half (to form a rectangle) in  both directions. Open flat.

3. Push both sides in to form a triangle (see diagram below).


4. Lay the triangle on the table and fold the two 'arms' of the triangle into the middle using the fold line as a guide.


5. Flip the piece over and do the same on the other side.

6. Make seven more of these pieces.

7. Slide the 'prongs' of one into another piece; fold them once they've been inserted.


8. Join all of the pieces together as above.


9. Join the last two pieces and you are done!


The piece will pivot through the middle and take different shapes, like the original 'cake', or wear it as a crown.


Simple and fun.

Happy crafting.

Monday, 17 December 2018

Gift Card Holders

My daughter, Kieran, recently made some gift card holders for some, er, gift cards she was giving for Christmas. She did an excellent job and our craft group asked if she would do a class. So she did!


One of the ones that Kieran made

Equipment

  • Paper Trimmer 
  • Bone Folder
  • Punches, dies, etc, as desired

Materials

  • 6” x 4” Patterned Paper
  • 6” x 4” Light Coloured Plain Cardstock, e.g. Whisper White or Very Vanilla
  • Tear and Tape
  • Embellishments, as desired

Instructions

1. Cut the patterned paper 5¾“ x 4” and score at 2½“ and 5” on the long side.

2. Fold on the score marks and burnish with a Bone Folder.


3. Apply adhesive to the edges only of the small piece to form a pocket to hold the gift card, approximately ½” at each end. Fold this piece up.

4. Place a piece of Tear and Tape across the bottom so that the holder can be sealed once the gift card is in place.

5. Create labels and/or images (stamped or die cut) for the front of the holder.

6. Stamp "To" and "From" on some plain cardstock and attach to the back.

7. Attach labels and embellishments on the front of the card.


Note: Kieran found out that it is best to have the “To” and “From” on the back of the holder because if it’s inside you won’t be able to read it once it has been sealed.


Heather made these

The ones that I made

And that's it. Very simple.

Happy crafting!

Thursday, 6 December 2018

Mini Calendars

A year ago I made about 30 mini calendar cards as swaps for OnStage Local in Melbourne.


I shared the 'skill' with my craft group earlier this year and, at their behest, we had another class last week with 2019 calendars. I dug out a few different designs and the ladies enjoyed making their calendars. 

Desk Calendar

A very easy self-standing desk calendar.

Materials


·       Plain cardstock (calendar base) 8½" x 5½"
·       Patterned Paper to match, 2⅞" x 5⅜"
·       Coordinating cardstock (calendar mat), 3" x 2" (Note: The mat dimensions may need to be adjusted depending on the actual size of the calendars)
·       Mini calendars (we got ours on eBay)

Equipment

·       Paper trimmer
·       Bone folder
·       Adhesive, e.g. Tape Adhesive or Multipurpose Liquid Glue
·       Ribbon or Washi tape (optional)
·       Embellishments, e.g. Enamel Dots or Shapes, Faceted Gems


Instructions

1.      Cut the base cardstock 8½" x 5½", score at 3", 6", 7" and 8" on the long side. Fold so that it looks like the diagram on the right from the side. Do not apply any adhesive just yet though. It's easier to attach the other elements whilst it is still flat.
 2.      Cut the patterned paper 2⅞" x 5⅜".
 3.      Adhere the patterned paper to either of the two long sides.
 4.      Cut the calendar mat 3" x 2".
 5.      Adhere the calendar to the mat, then adhere them both to the patterned paper on the calendar.
 6.       Decorate and embellish as desired.

Examples


Other Versions

Landscape Self-Standing Calendar

Basically the same as the one above, but in landscape

Here's one made by Samantha at our class

·       Cut your cardstock 4” x 11½” and score at 4½”, 9”, 10” and 11”
·       Cut the card mat/patterned paper 3¾” x 4¼”
·       Cut the calendar mat 3” x 2” (check the size of your calendar first) and adhere to the calendar
·       Adhere the calendar to the card and add embellishment as desired

Heather made this one

Another of Sam's creations


Easel Card Calendar

·       Cut cardstock 4” x 10”, score at 5” and 7½“ on the long side for the base
·       Cut a second piece 4” x 5” for the card front
·       Cut patterned paper 3¾” x 4¾” for the card front
·       Adhere the card front to the card base but only up to the score line (i.e. 2½” from the bottom)
·       Cut the calendar mat 3” x 2” (check the size of your calendar first) and adhere to the calendar
·       Cut a second piece of patterned paper 3¾” x 3¾” and adhere on the card base (the yellow patterned paper in the photo) and add a pad of sticky notes or small note pad.
 ·       Add sentiments/embellishments as desired OR you can make it as above but then

·       Cut patterned paper 3½“ x 3½“ and a piece of cardstock 3¾” x 3¾”
·       Adhere them together and then mount them with Foam Dimensionals and not include a pad of sticky notes.
·       Or add a label or similar that is mounted with Dimensionals. Anything to stop the top sliding down.
·       Add sentiments/embellishments as desired


Fridge Magnet Calendar


Make a card front measuring, e.g. 4” x 6” (or any size, really), decorate as desired, adhere the calendar and add a magnetic strip to the back.


And there you have it.

Happy crafting.