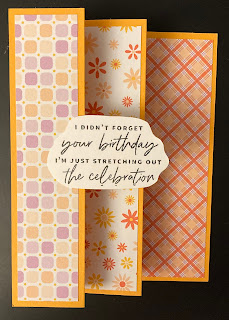
Today's card is one that I was supposed to make earlier in the month but it needed 12" x 12" cardstock so I had to postpone it until I received my order. Fun Fold Cards are fun and folded, lol. They're very easy to make - the hardest part is deciding on 3 different pieces of coordinating Designer Series Paper. I only made two cards today and I will provide the measurements at the bottom.
I used the Dandy Designs Designer Series Paper again. It has so many different designs and is easy to match up. I have selected another of my new stamps sets to use. It's one that has sentiments only, which is great. It's called Something Fancy Stamp Set.
There is a matching die set as well, Something Fancy Dies. You can buy both together in the Something Fancy Bundle for a saving.
These cards look impressive and, of course, fold flat to fit in an envelope. They don't sit flat for photos however. The photos show the front of the card and the card opened out. If you use a dark cardstock as a card base you can add a piece of white or light-coloured cardstock on the blank panel near the back of the card to write on.
Card 1
Card 2
 |
| I stamped "Happy Birthday" directly onto the back panel. You can place another label there instead, if you want. |
Measurements
Coloured Cardstock (card base): Cut 6" x 12", score at 1½", 3", 5½" and 8".
Designer Series Paper (3 different designs)
Instructions
1. Attach the DSP to their respective panels on the card.
2. Add images/sentiments or embellishments as desired.
TIP: Be careful adding adhesive to your shapes that hang off the side of a fold. You don’t want to tape your card shut!
That's all for today. See you tomorrow.
Happy crafting.


No comments:
Post a Comment